| For detailed technical API documentation: DiManEx Technical Documentation |
1. Overview
The APIs functional documentation serves as a comprehensive guide for developers and integrators who wish to utilize the application’s APIs for various purposes. This documentation outlines the available APIs, their functionalities, and the necessary steps to interact with them effectively.
By leveraging the power of these APIs, developers can unlock new possibilities and create innovative solutions that seamlessly integrate with the DiManEx application, enhancing productivity and streamlining processes across various domains.
2. Access and Authentication
| Authentication with an API key will be required in the DiManEx technical documentation |
The DiManEx API leverages API keys for authentication purposes. These keys can be generated at the customer account level.
2.1 Generate Access and Secret Keys
-
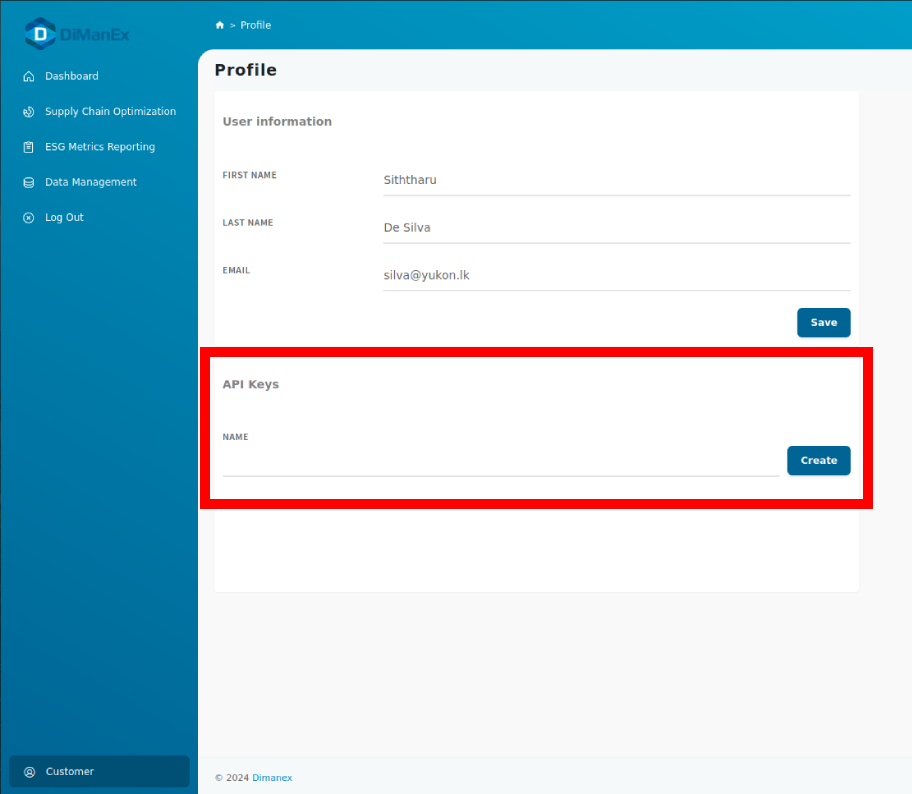
Click on the account name in the bottom left corner to navigate to the Profile section as a customer.

| Treat your API key as highly confidential information. Never disclose it to unauthorized individuals or include it in client-side code (such as web browsers or applications) where it could be exposed to potential security risks. |
-
Next, provide a unique title for the new API key and click on "GENERATE API KEY" to get a new
Access Keyand aSecret key.
2.2 Generate and use API key to authenticate API requests
After generating the Access Key and Secret Key the final API key is formed by combining these two components separated by a colon (":"). The format for the API key is as follows:
[Access Key]:[Secret Key]
For example, if your Access Key is "abc123" and your Secret Key is "xyz456", then your final API key would be:
abc123:xyz456
This API key should be included in the request headers when making API calls for authentication purposes. The API key is passed using the X-DMNX-AUTH header with the API key value.
Here’s an example of how you might include the API key in an API request using CURL:
curl --request GET \
     --url https://api.example.com/endpoint \
     --header 'X-DMNX-AUTH: abc123:xyz456'
2.3 Removing an API key
Follow the below steps to remove an API key and safeguard your account’s integrity. For enhanced security, we advise removing your API key if you suspect any potential compromise.
-
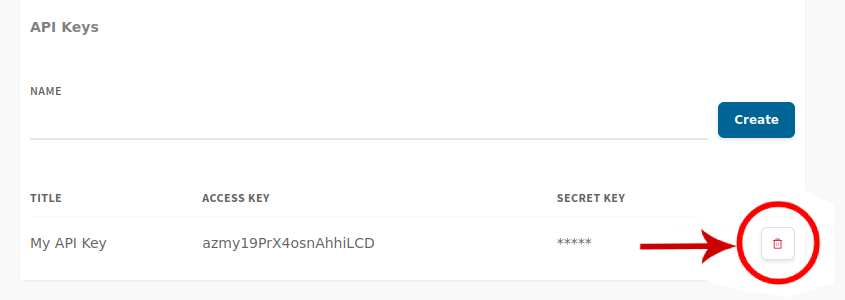
As a customer, navigate to Profile section.
-
Find the key you would like to remove.
-
Click on the red bin icon to remove the API key.
3. API Usage Scenarios
3.1. Data Correction
3.1.1 Bulk Data Upload
The Bulk Data Upload functionality allows users to upload large numbers of parts at once and correct any data points that require updating. This feature is particularly useful when dealing with bulk data operations, enabling efficient data correction for multiple parts simultaneously.
UI Based
-
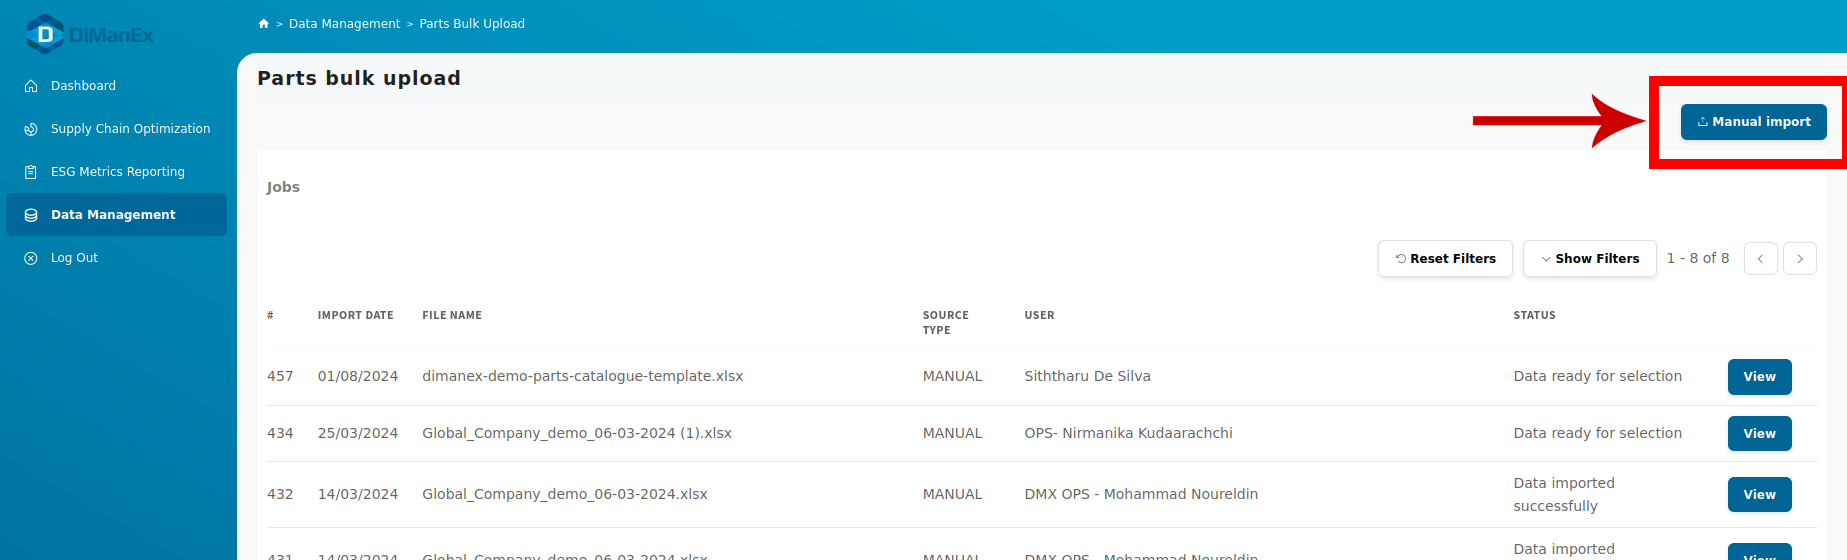
Go to the 'Data Management' page, click on 'New Part', click on 'Upload Bulk Parts' (redirects to 'Parts Bulk Upload' page), and click on 'Manual Import'.
-
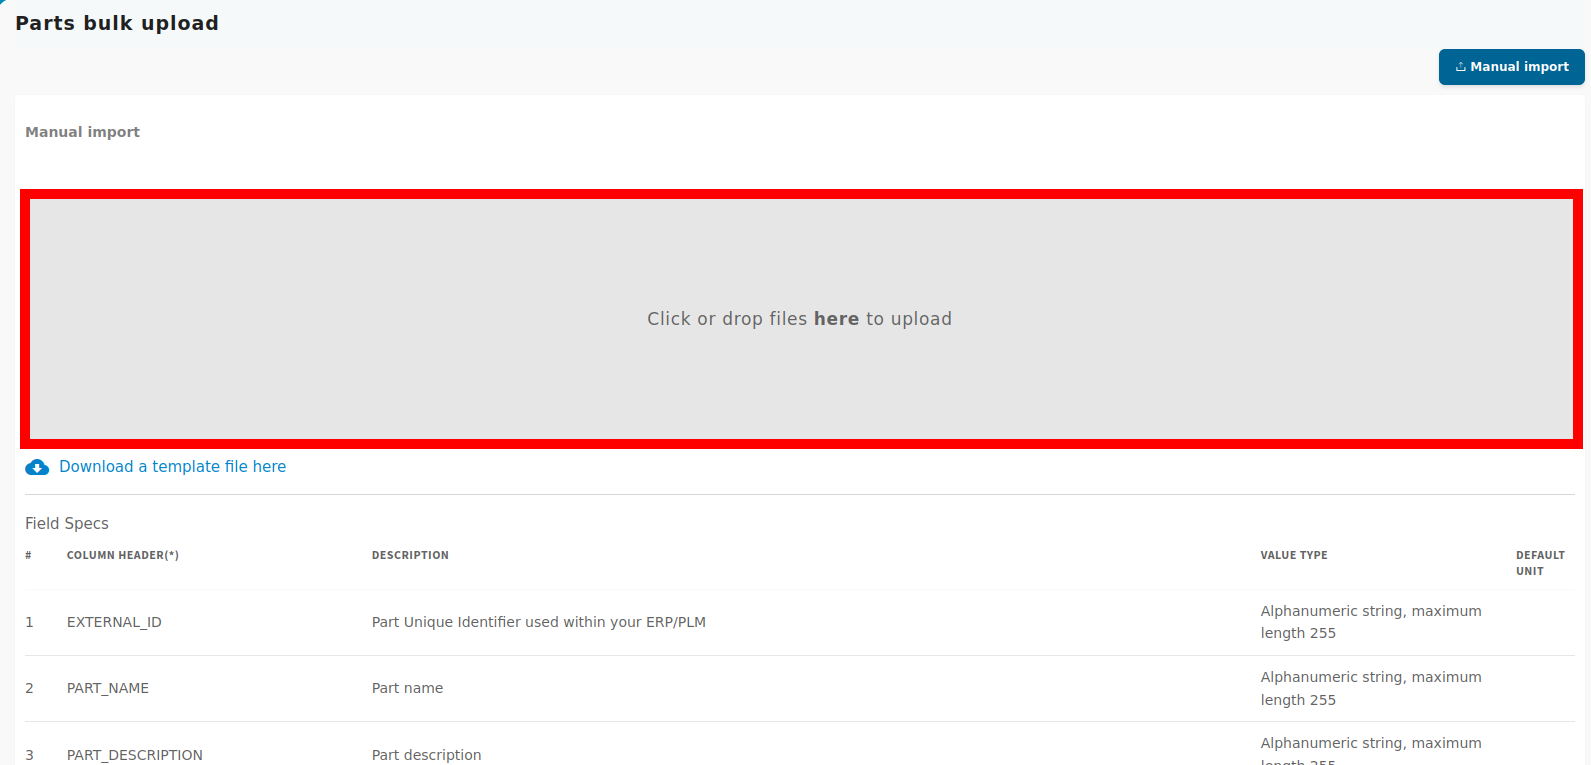
Upload the files containing parts data to the designated area (as shown in the image below). The system will automatically import the parts.
-
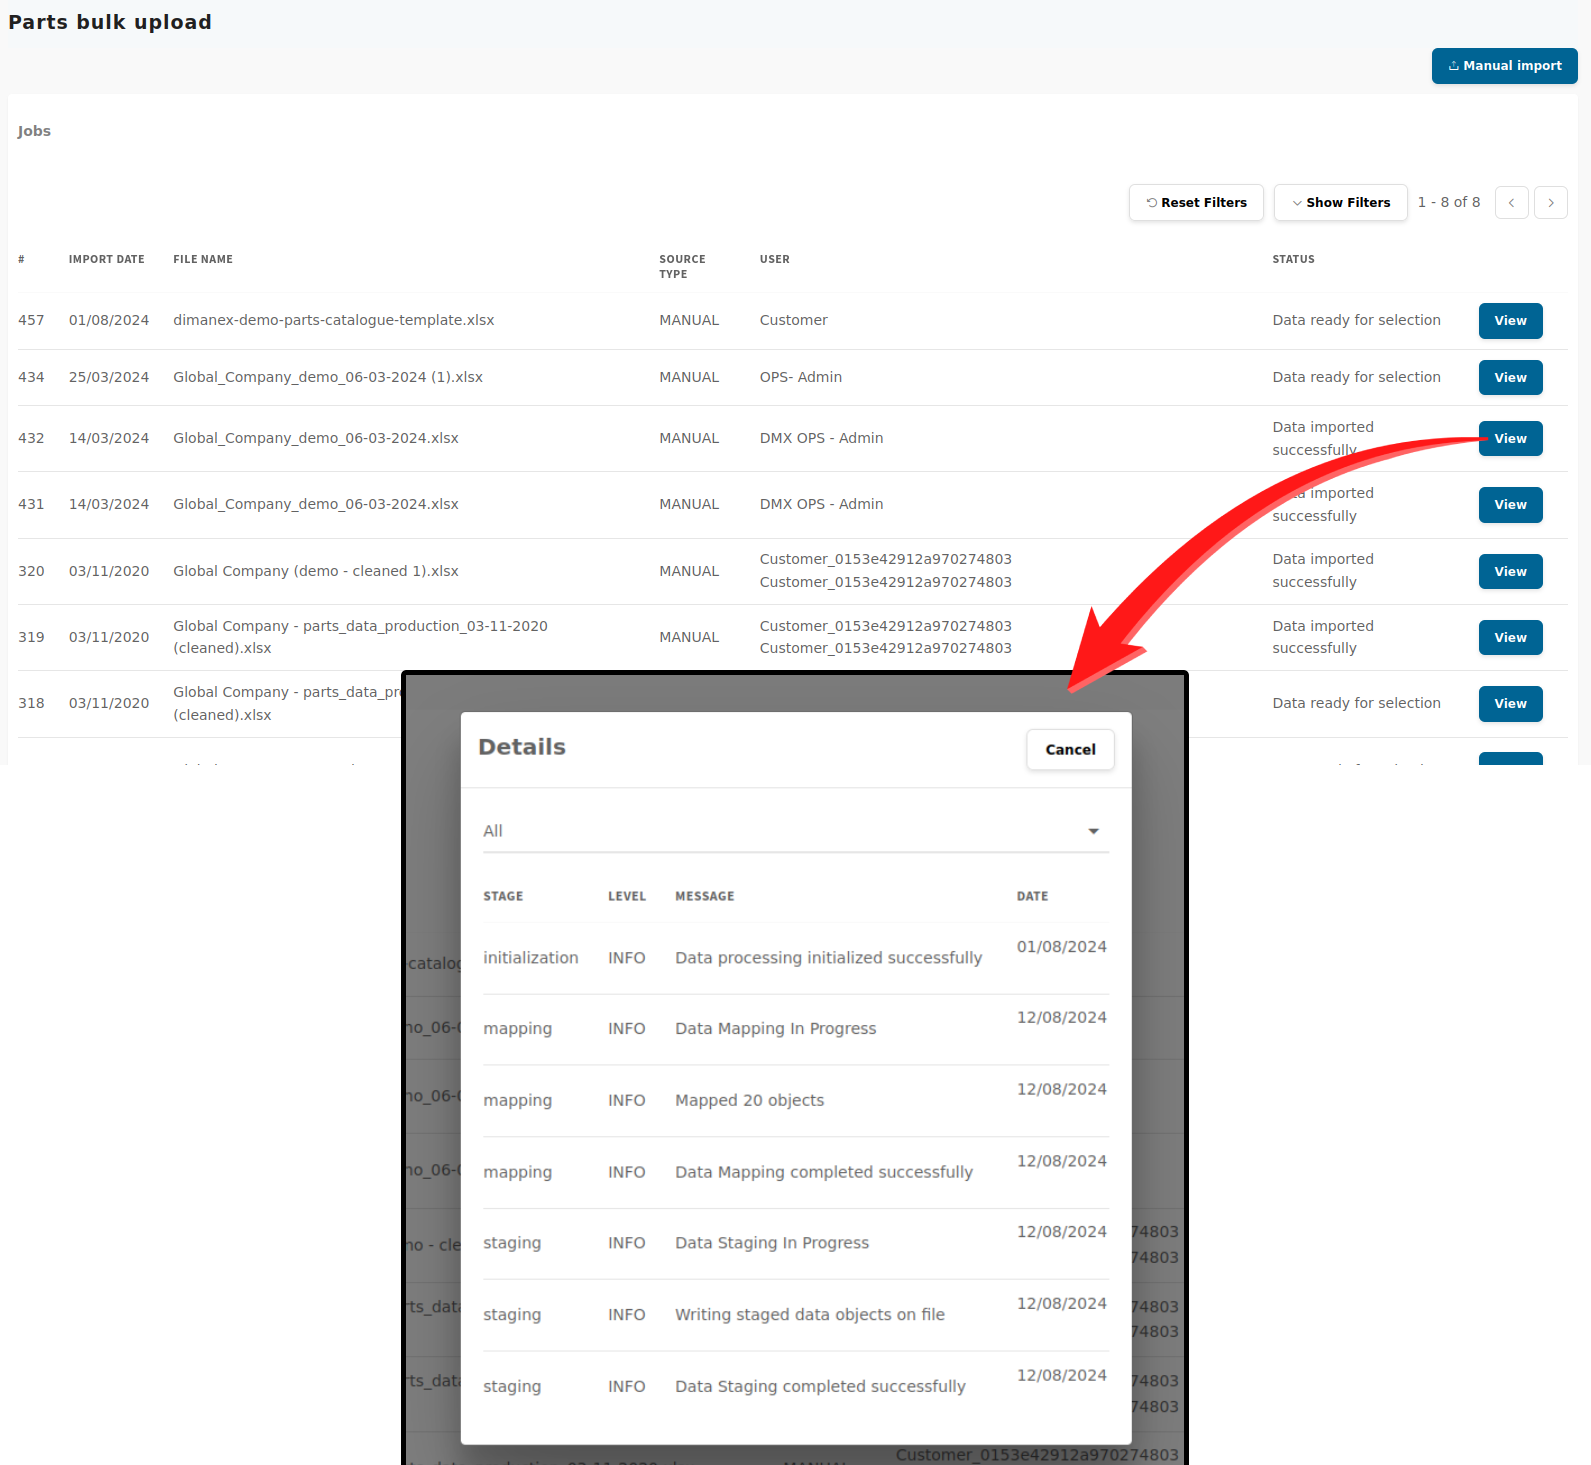
Uploaded files will be added to the job list on the Data Import page. Click on the 'View' button next to a specific job to view its specific logging details.
-
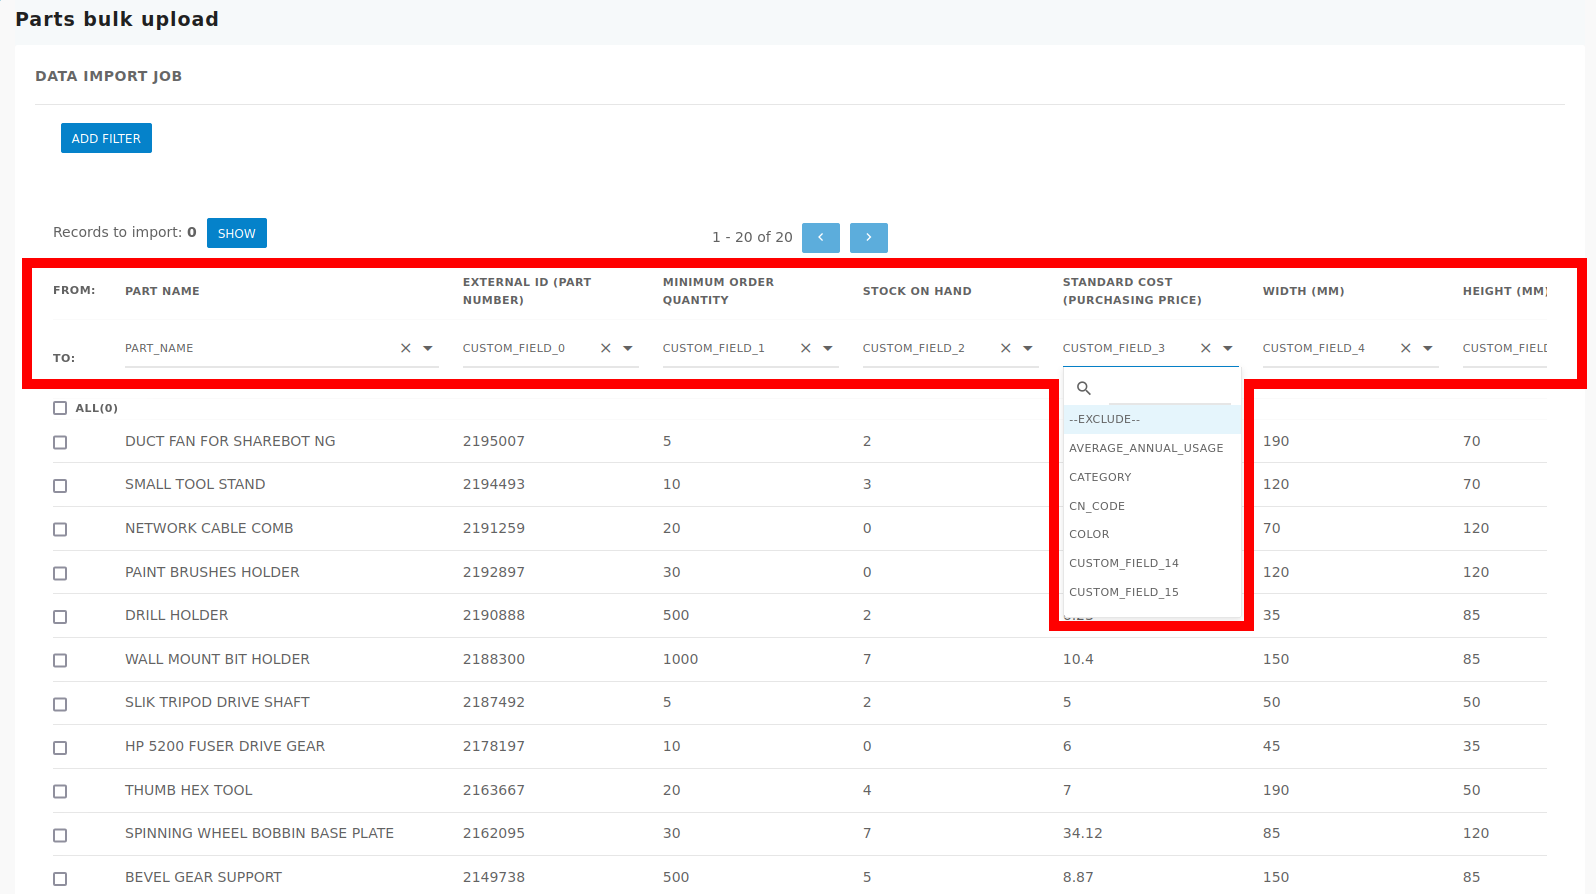
From the job list, select the relevant job for the uploaded data. Map the correct data-points: DiManEx Field with Source Field.
-
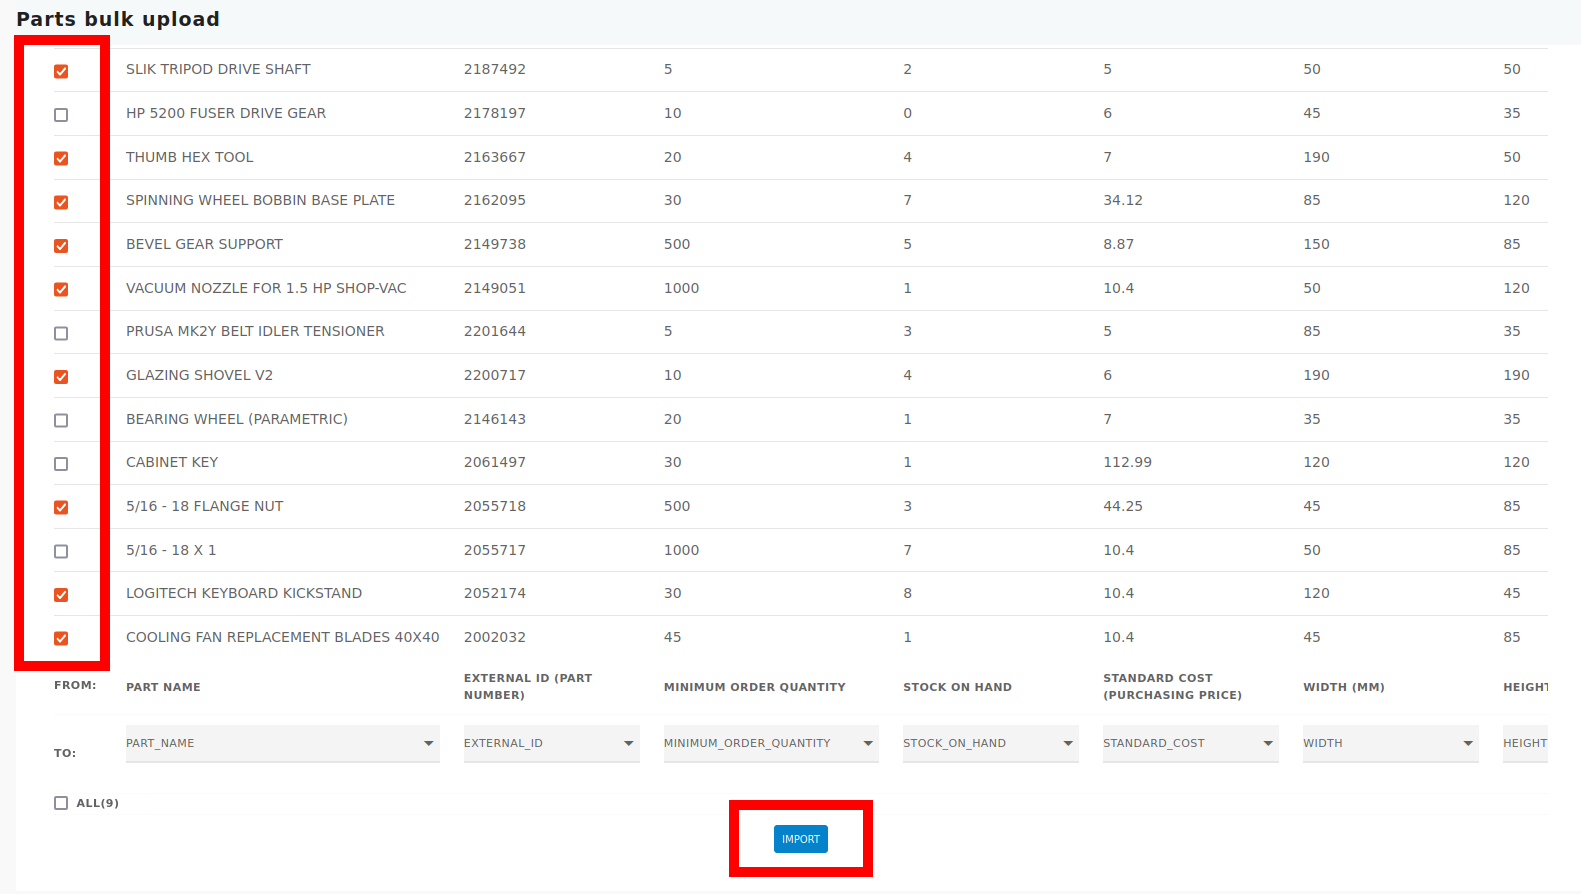
Finally, select the relevant parts to be uploaded and click the 'Import' button to import the data.
API Based
— API to upload part data file:
POST ⇒ /zuul/storage/import
-
Query Parameters
-
dataTypeas a String value:-
Available values : PART
-
Default value : PART
-
-
-
Request Body
[ EMPTY ]
— APIs to get jobs list and their information:
For job list:
GET ⇒ /api/integration-source-types
-
Query Parameters
-
filterDTOas an Object:{ "sort": "string", "query": "string" }
-
-
Request Body
[ EMPTY ]
GET ⇒ /api/integration-source-jobs
-
Query Parameters
-
searchContextas an Object:{ "page": 0, "count": 0, "query": "", "sort": "" }
-
-
Request Body
[ EMPTY ]
For logging details of a specific job:
GET ⇒ api/etl-logging-details/stages
-
Query Parameters
No Parameters
-
Request Body
[ EMPTY ]
GET ⇒ /api/etl-logging-details/job-info
-
Query Parameters
-
jobIdas a String value -
etlImportStageas a String value:-
Available values : ALL, INITIALIZATION, MAPPING, VALIDATION, STAGING, ETL_IMPORT
-
Default value : VALIDATION
-
-
-
Request Body
[ EMPTY ]
— APIs to select records and import data of selected records:
To select the records to import:
PUT ⇒ /api/etl-staging/import-selection
-
Query Parameters
-
jobIdas a String value -
doSelectas a Boolean value -
dataTypeas a String value:-
Available values : PART
-
Default value : PART
-
-
searchContextas an object:{ "page": 0, "count": 0, "query": "", "sort": "" }
-
-
Request Body
[ EMPTY ]
To import the data of selected records:
PUT ⇒ /api/integration-source/jobs/{id}/approval-view-state
-
Query Parameters
-
idas a String value
-
-
Request Body
{
  "query": {
    "values": {
      "filters": []
    },
    "queryString": false
  },
  "finalMappingDescription": [
    {
      "fromField": "string",
      "toField": "string"
    }
  ],
  "sort": ""
}
POST ⇒ /api/etl-staging/import
-
Query Parameters
-
jobIdas a String value -
dataTypeas a String value:-
Available values : PART
-
Default value : PART
-
-
-
Request Body
[ EMPTY ]
3.1.2 Parts Details View
The Parts Details View functionality enables users to view and modify detailed information about individual parts. It provides a comprehensive interface to access and update various data points associated with each part, such as economical and technical parameters, specifications, descriptions, and other relevant details.
| In a single part details view, with UIs only one data point can be updated at a time, but with the API, multiple data points can be updated within a single API call, providing a convenient and efficient way to perform bulk data corrections. |
UI Based
-
Go to 'Data Management' page and select a part from the 'Parts' section to go into the part details view.
-
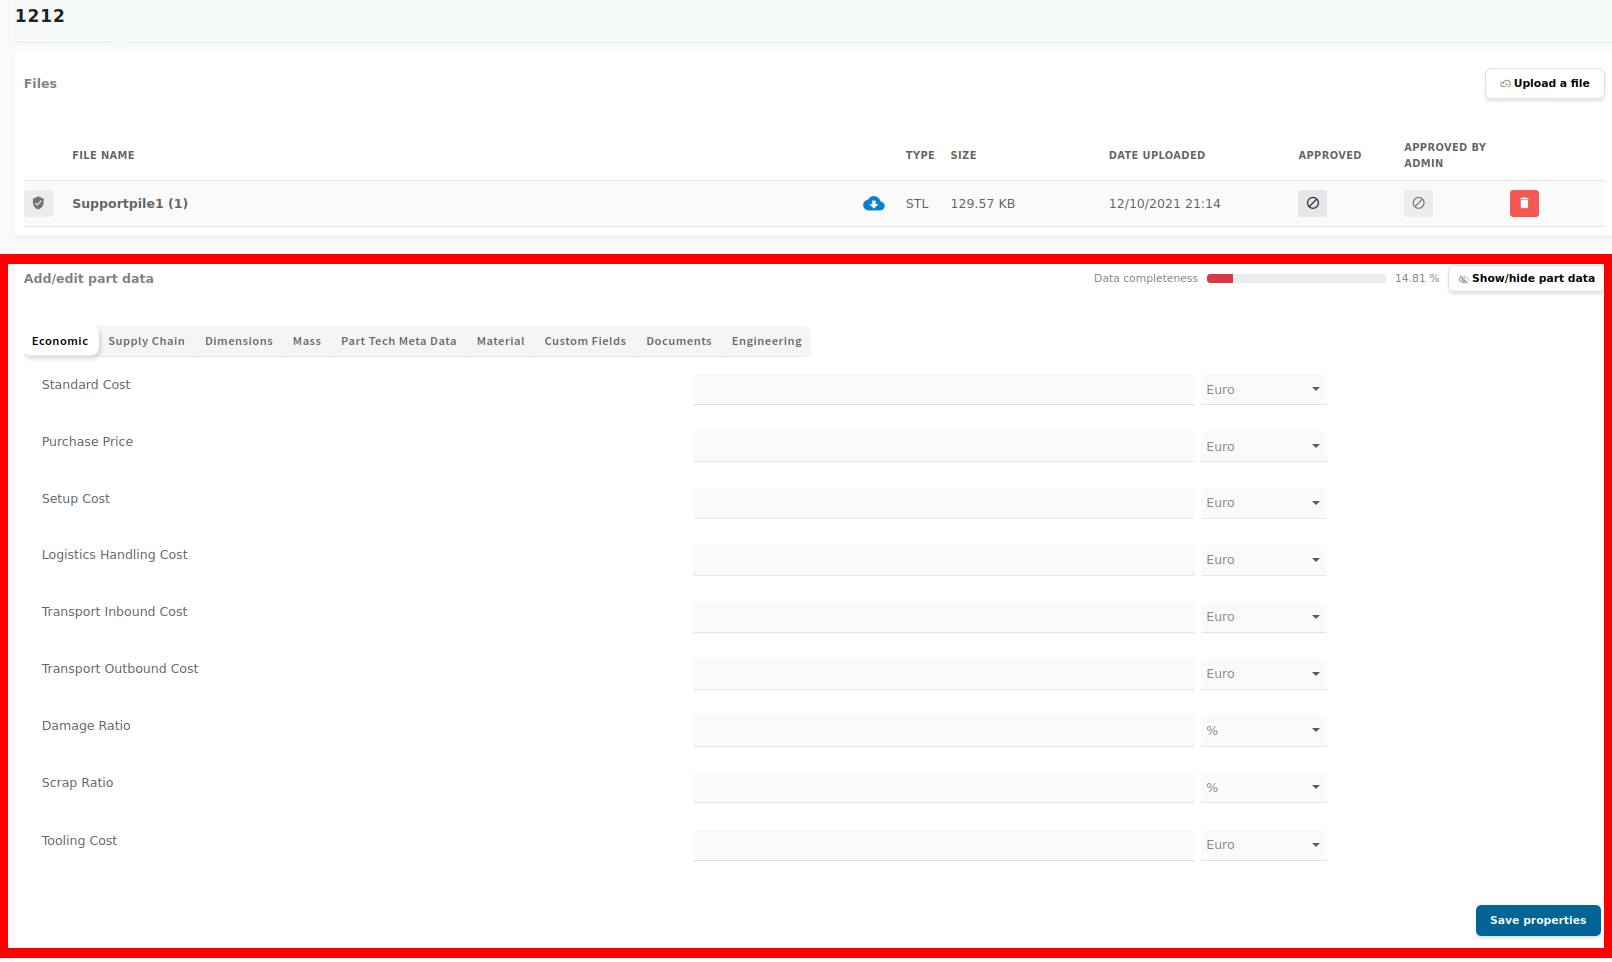
Inside part details view, find the 'Add/Edit Part Data' section.
-
Fill out the necessary data points.
3.2. Digitization
The Digitization feature enables users to request the conversion of physical parts or models into digital representations. This process is particularly useful for creating digital twins, virtual simulations, or preparing data for various manufacturing processes. The Digitization APIs provided by DiManEx allow developers to integrate this functionality seamlessly into their applications.
| Stay alert with the part status as it will be changing at each stage in the process mentioning the current status of the part. |
Once a part is uploaded, the digitization process for that specific part will begin.
3.2.1 Track 1
Track 1 is used to upload and digitize STL or 3D files.
UI Based
-
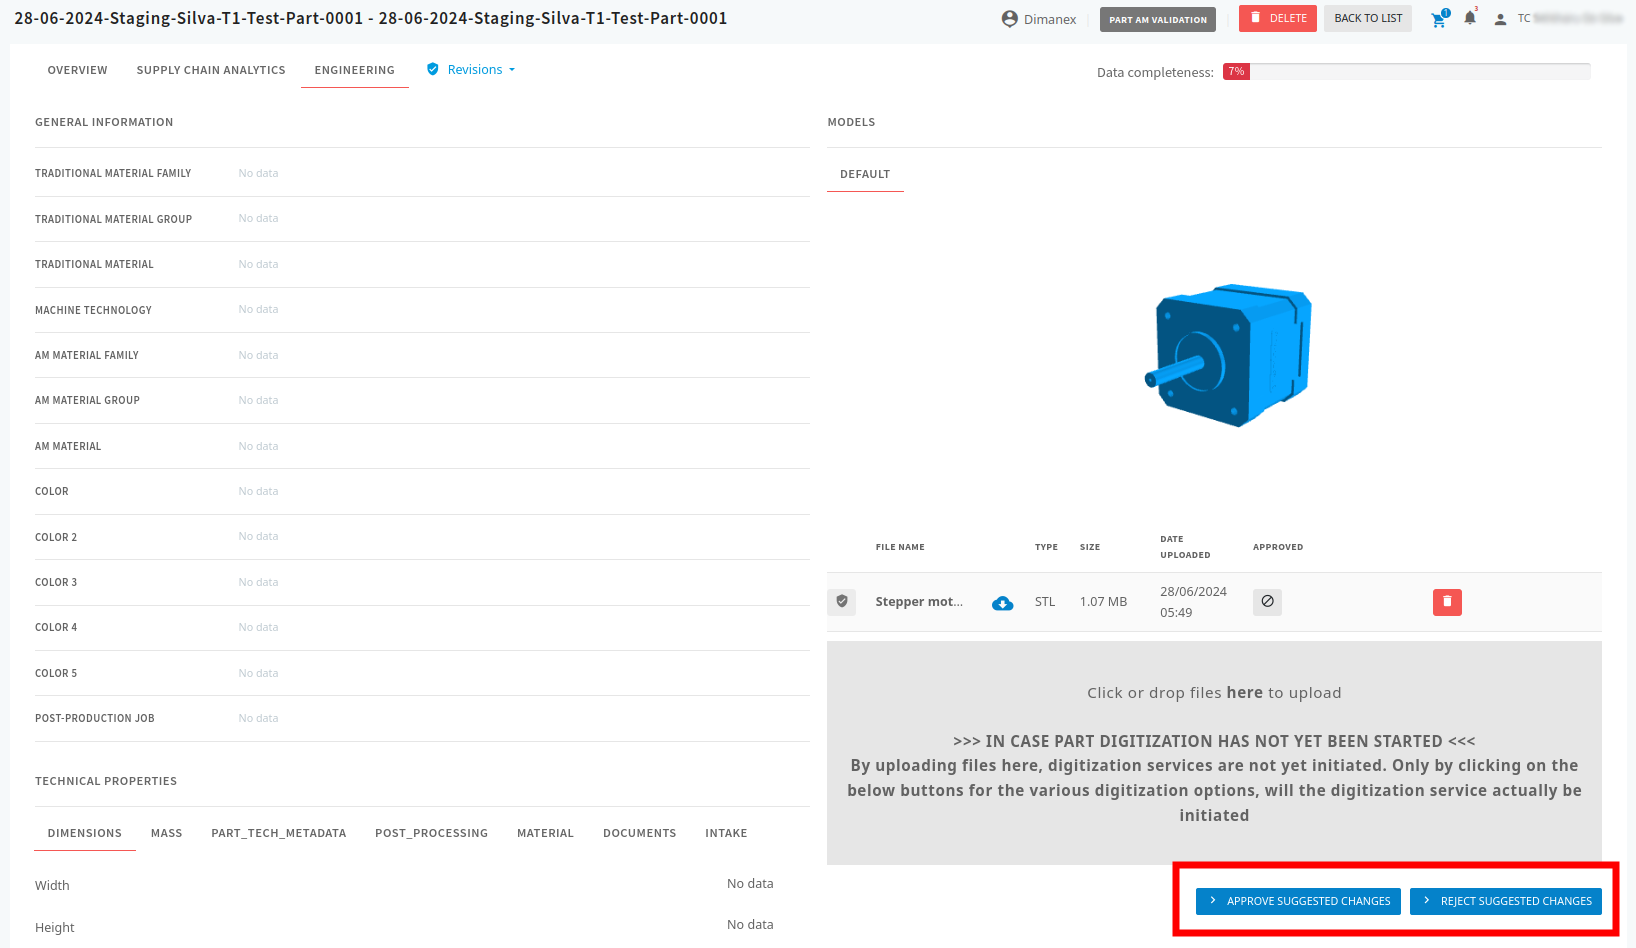
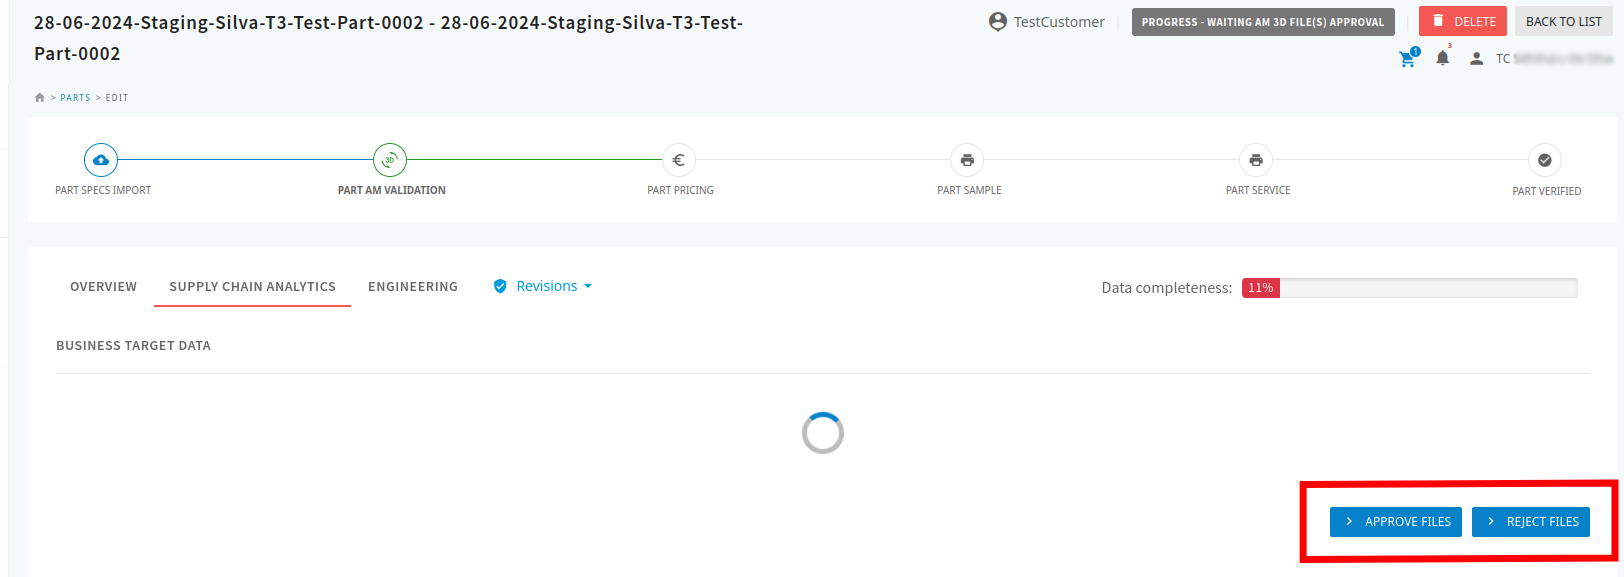
If the STL/3D file is rejected due to insufficient data,
-
two buttons, 'Approve Suggested Changes' and 'Reject Suggested Changes', will appear in 'Supply Chain Analytics' and 'Engineering' tabs.
-
[ TO BE RE-PLACED BY THE SCREENSHOTS FROM THE NEW UI ]
-
From either tab, click the 'Approve Suggested Changes' button to approve the changes, or the 'Reject Suggested Changes' button to reject the changes.
-
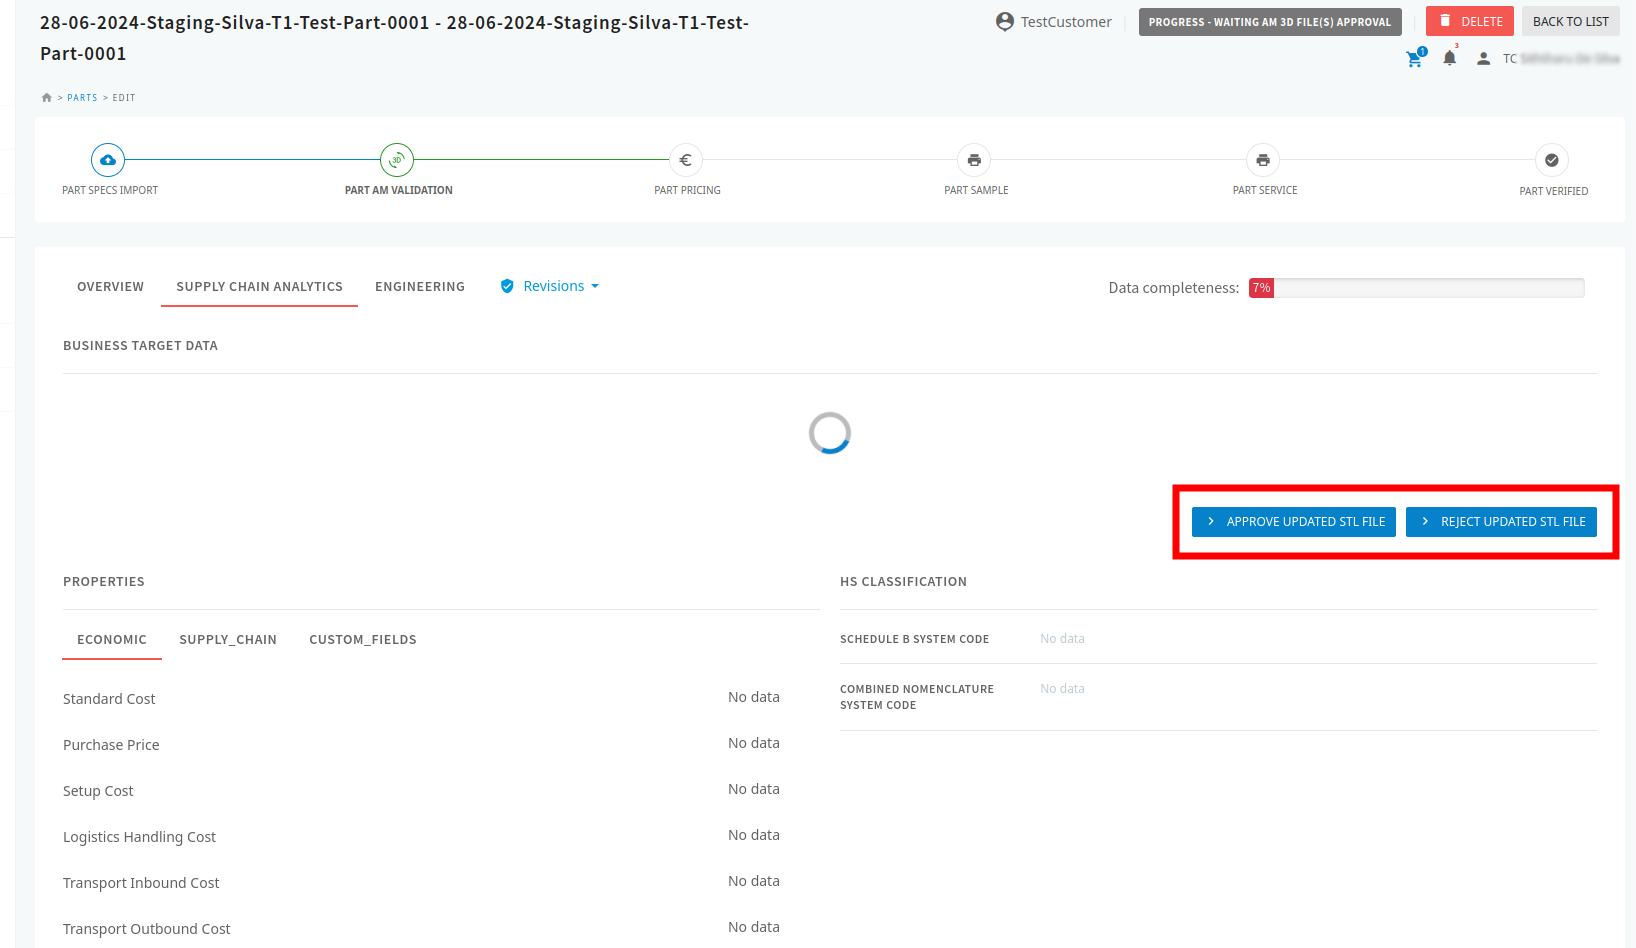
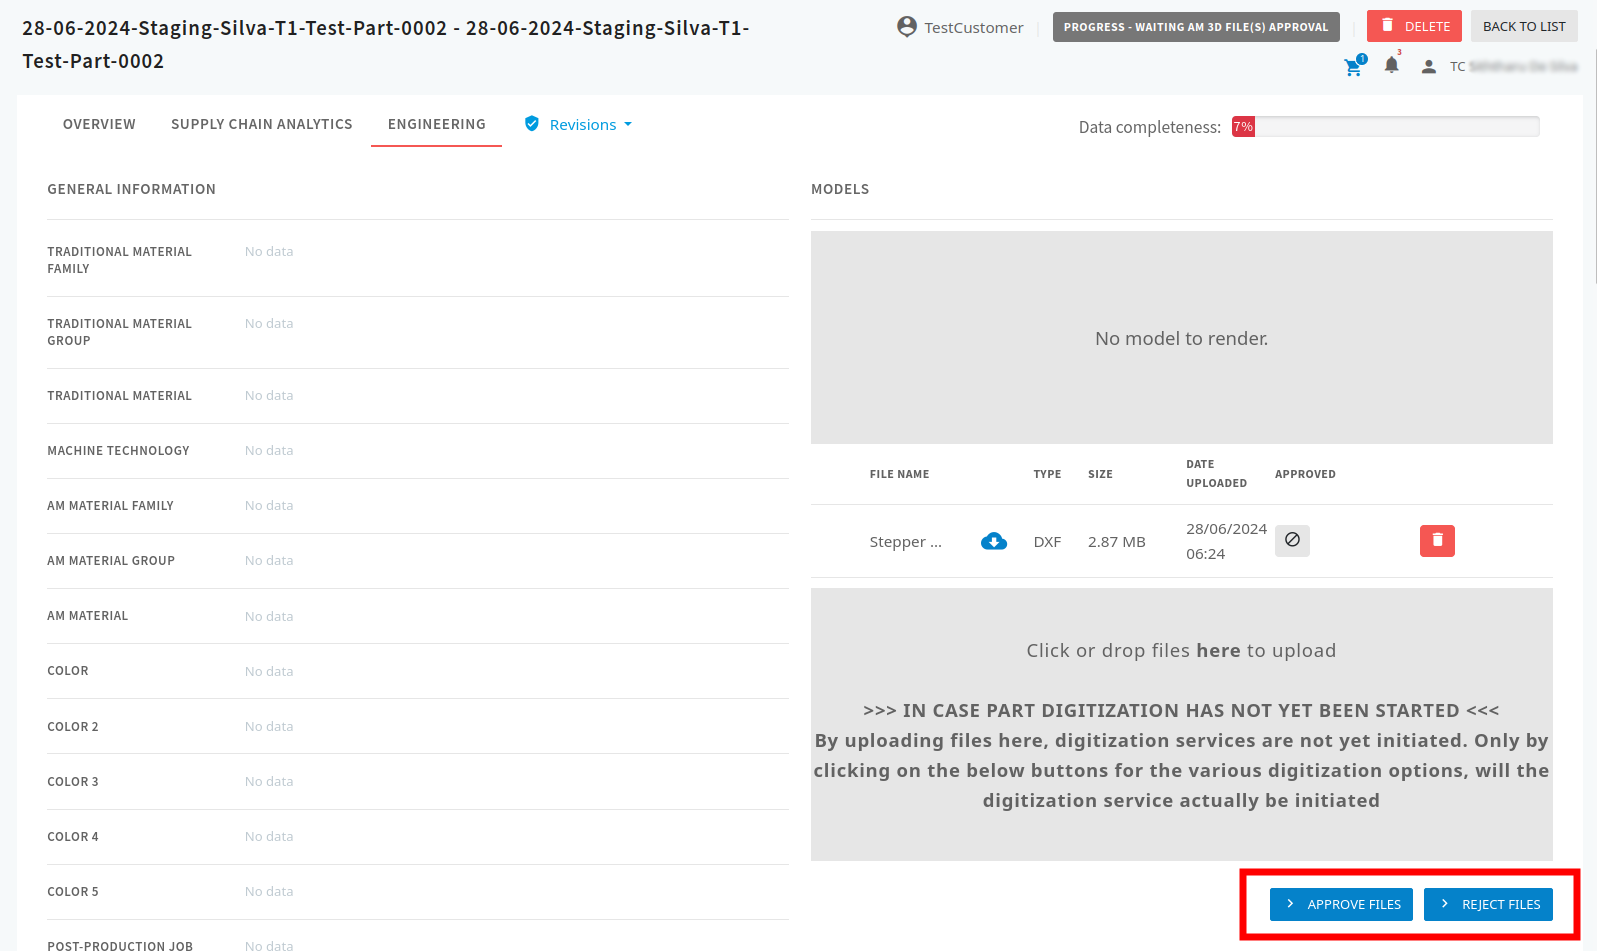
Once the suggested changes are approved, wait for the AM to upload the updated STL/3D file. Upon receiving the updated file, two buttons, 'Approve Updated STL File' and 'Reject Updated STL File' (or 'Approve Files' and 'Reject Files' if the user is in the 3D file work path), will appear in the same tabs mentioned earlier.
STL file work path:
[ TO BE RE-PLACED BY THE SCREENSHOTS FROM THE NEW UI ]
3D file work path:
[ TO BE RE-PLACED BY THE SCREENSHOTS FROM THE NEW UI ]
-
After reviewing the updated STL file, click the 'Approve Updated STL File'/'Approve Files' button to approve the file, or the 'Reject Updated STL File'/'Reject Files' button to reject the file.
API Based
— API to approve the suggested changes:
for STL file:
POST ⇒ /api/bpm/parts/{id}/customer-approve-stl-file-changes-from-dsp
for 3D file:
POST ⇒ /api/bpm/parts/{id}/customer-approve-stl-file-changes-from-dsp
-
Query Parameters
-
idas a String value
-
-
Request Body
{
  "comment": "string",
  "empty": true
}
— API to reject the suggested changes:
for STL file:
POST ⇒ /api/bpm/parts/{id}/customer-decline-stl-file-changes-from-dsp
for 3D file:
POST ⇒ /api/bpm/parts/{id}/customer-reject-3d-file-changes-from-dsp
-
Query Parameters
-
idas a String value
-
-
Request Body
{
  "comment": "string",
}
— API to approve the updated STL/3D file:
for STL file:
POST ⇒ /api/bpm/parts/{id}/customer-approve-updated-stl-file-changes-from-dsp
for 3D file:
POST ⇒ /api/bpm/parts/{id}/customer-3d-file-work-approve-updated-3d-file
-
Query Parameters
-
idas a String value
-
-
Request Body
{
  "comment": "string",
  "empty": true
}
— API to reject the updated STL/3D file:
for STL file:
POST ⇒ /api/bpm/parts/{id}/customer-decline-updated-stl-file-changes-from-dsp
for 3D file:
POST ⇒ /api/bpm/parts/{id}/customer-3d-file-work-decline-updated-3d-file
-
Query Parameters
-
idas a String value
-
-
Request Body
{
  "comment": "string"
}
3.2.2 Track 2
Track 2 is used to upload and digitize 2D drawings.
UI Based
-
If the 2D drawing is approved, two buttons, 'Approve Files' and 'Reject Files', will appear, allowing the approval or rejection of the AM uploaded STL/3D file(s).
[ TO BE RE-PLACED BY THE SCREENSHOTS FROM THE NEW UI ]

-
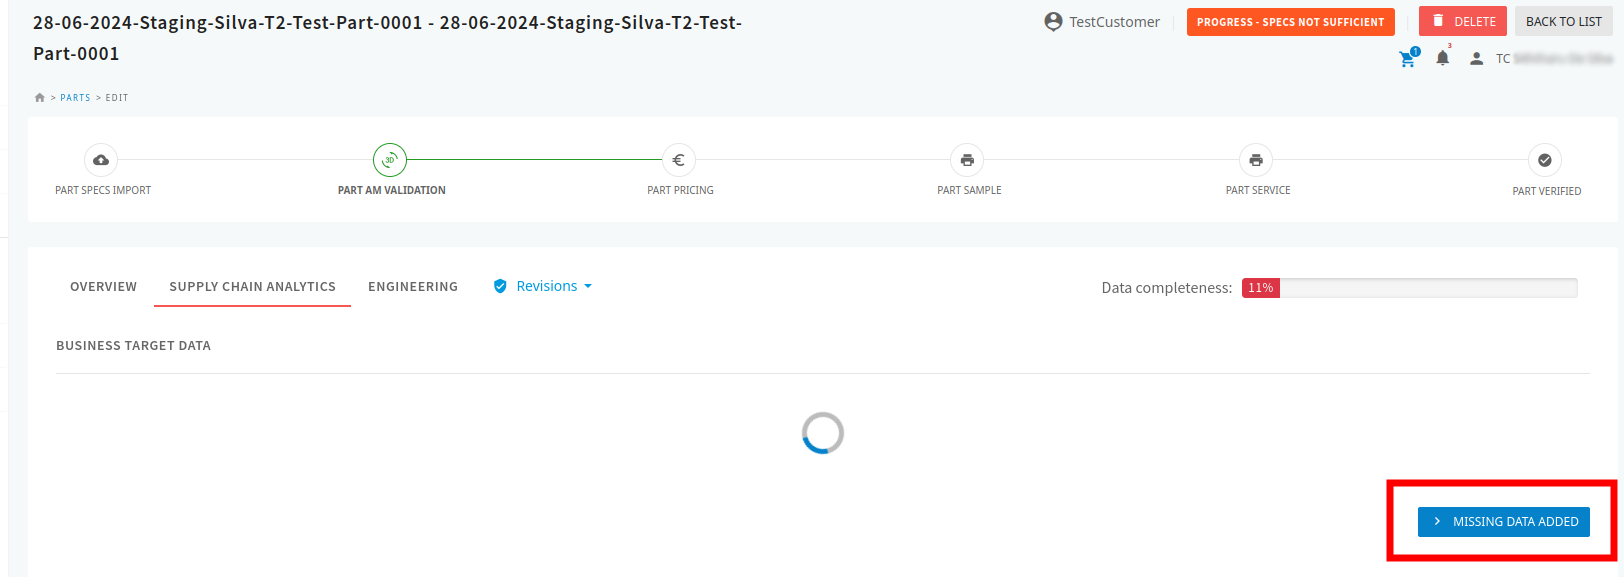
If the 2D drawing is rejected due to insufficient data, a button labeled 'Missing Data Added' will appear in the part details view, which can be used to confirm after adding the necessary data.
[ TO BE RE-PLACED BY THE SCREENSHOTS FROM THE NEW UI ]
API Based
— API to approve the step file from DSP:
POST ⇒ /api/bpm/parts/{id}/customer-action-approve-step-file-from-dsp
-
Query Parameters
-
idas a String value
-
-
Request Body
{
  "comment": "string",
  "empty": true
}
— API to reject the step file from DSP:
POST ⇒ /api/bpm/parts/{id}/customer-action-reject-step-file-from-dsp
-
Query Parameters
-
idas a String value
-
-
Request Body
{
  "comment": "string"
}
— API to add missing data based on the comment from DSP:
POST ⇒ /api/bpm/parts/{id}/customer-action-on-dsp-comment
-
Query Parameters
-
idas a String value
-
-
Request Body
{
  "comment": "string"
}
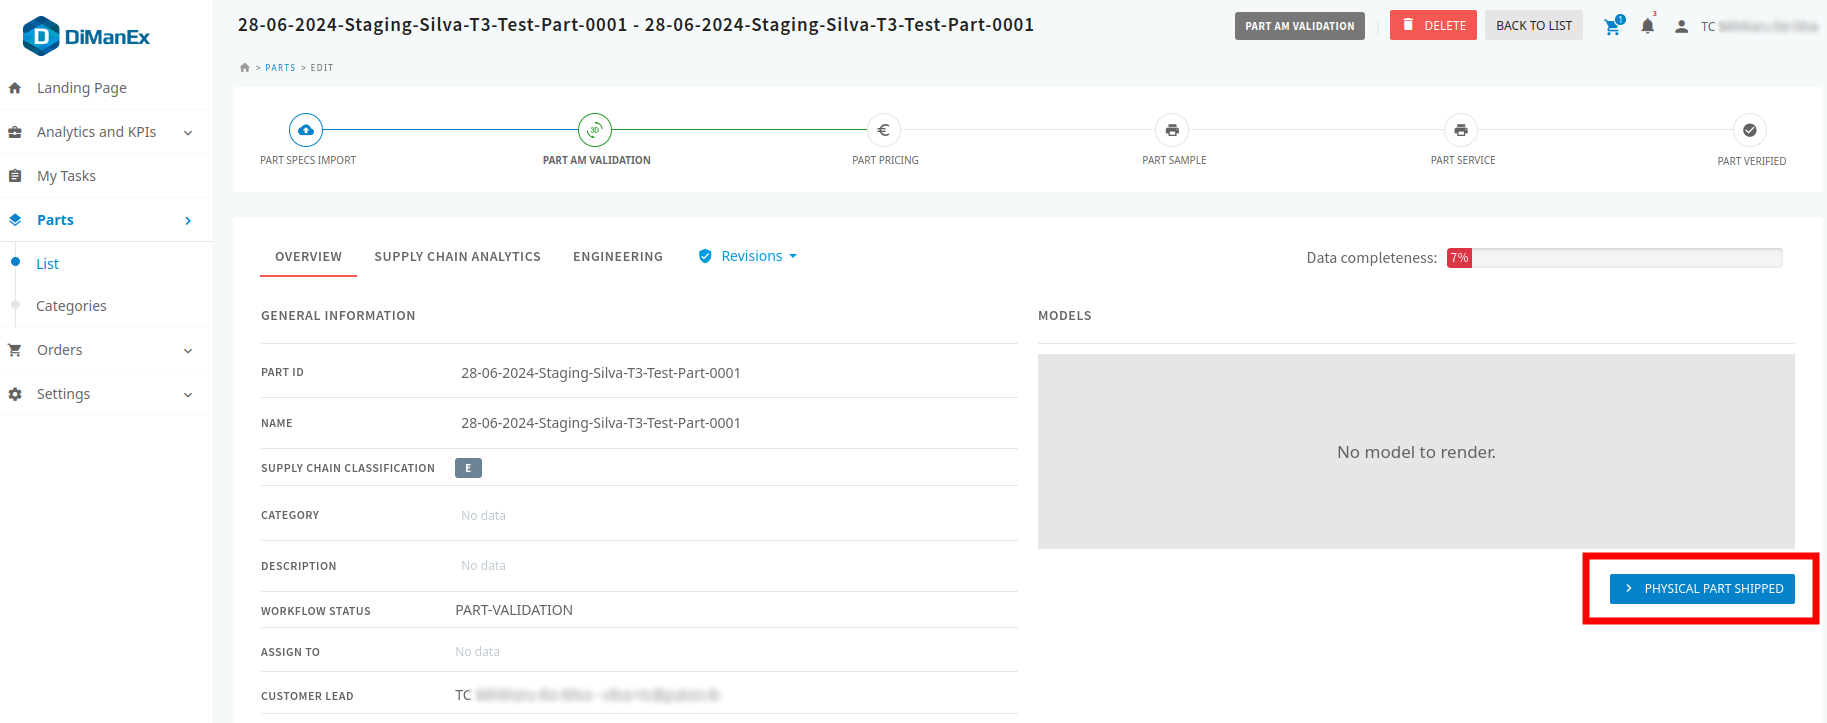
3.2.3 Track 3
Track 3 is used to upload and digitize physical parts.
UI Based
-
In the part details view, the button 'Physical Part Shipped' will be present, which is used to confirm that the physical part has been shipped.
[ TO BE RE-PLACED BY THE SCREENSHOTS FROM THE NEW UI ]
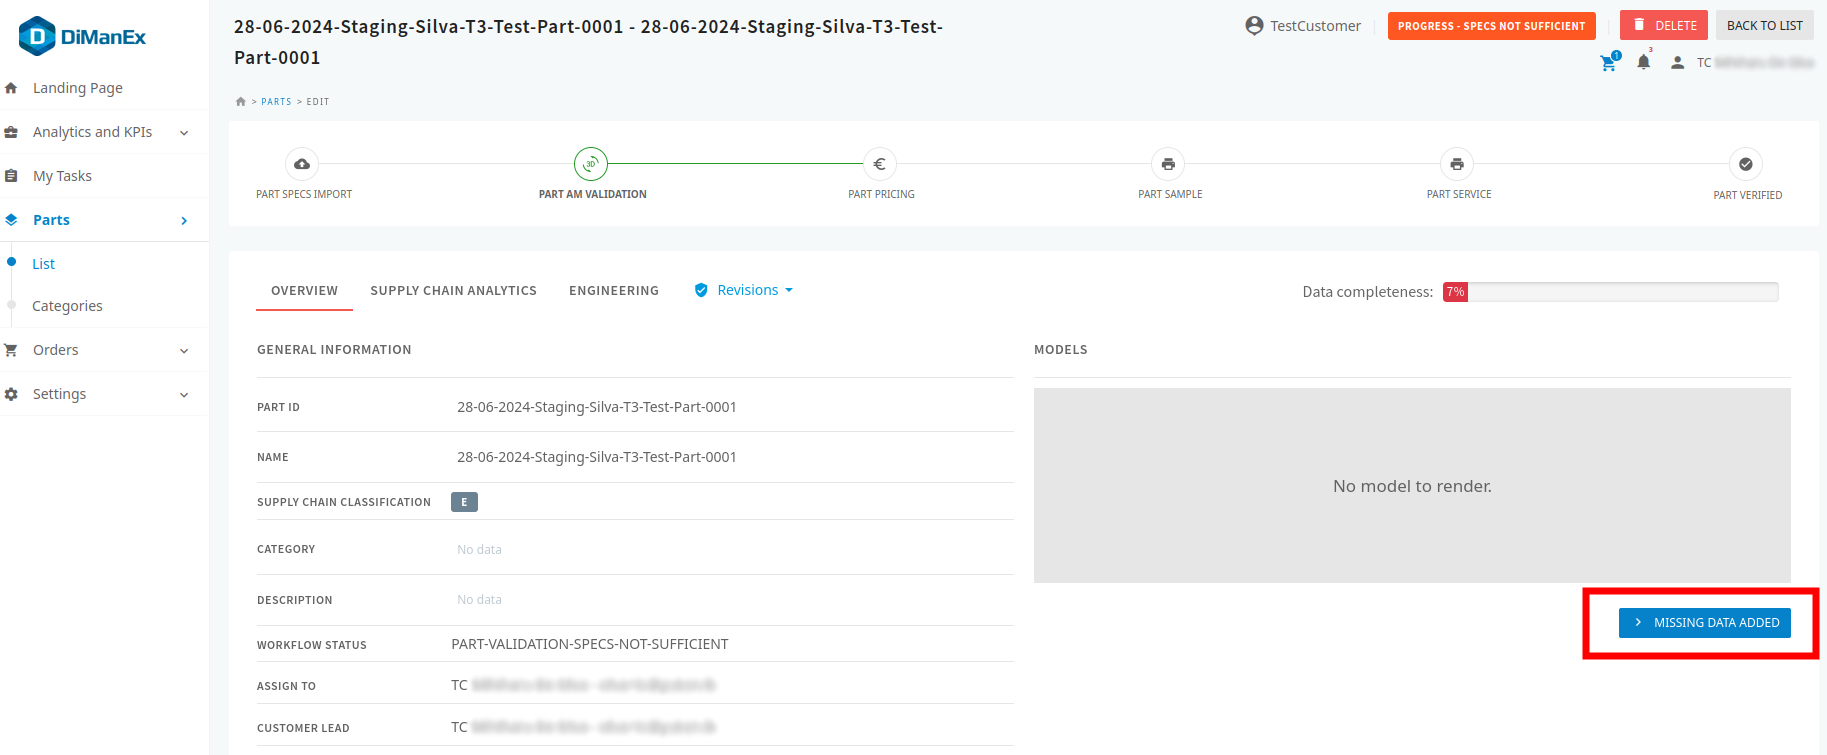
-
If rejection occurs due to insufficient data, a button labeled 'Missing Data Added' will appear in the part details view, which can be used to confirm after adding the necessary data.
[ TO BE RE-PLACED BY THE SCREENSHOTS FROM THE NEW UI ]
-
If the physical part is approved, two buttons, 'Approve Files' and 'Reject Files', will appear, allowing the approval or rejection of the AM uploaded STL/3D file(s).
[ TO BE RE-PLACED BY THE SCREENSHOTS FROM THE NEW UI ]
API Based
— API to confirm that physical part is shipped:
POST ⇒ /api/bpm/parts/{id}/pass-physical-item-to-dsp
-
Query Parameters
-
idas a String value
-
-
Request Body
{
  "comment": "string",
  "empty": true
}
— API to add missing data based on the comment from DSP:
POST ⇒ /api/bpm/parts/{id}/customer-action-on-dsp-comment-physical-item-track
-
Query Parameters
-
idas a String value
-
-
Request Body
{
  "comment": "string"
}
— APIs to approve and reject the step file from DSP:
POST ⇒ /api/bpm/parts/{id}/customer-action-approve-step-file-physical-item-track
-
Query Parameters
-
idas a String value
-
-
Request Body
{
  "comment": "string",
  "empty": true
}
POST ⇒ /api/bpm/parts/{id}/customer-action-reject-step-file-physical-item-track
-
Query Parameters
-
idas a String value
-
-
Request Body
{
  "comment": "string"
}
3.2.4 Common For All Tracks
This section contains UIs and APIs that are common for all the tracks: Track 1, Track 2, and Track 3.
UI Based
-
For all three tracks (Track 1, Track 2, and Track 3), if the files are:
→ approved, status will be changed to "PROGRESS - AM 3D FILE APPROVED"
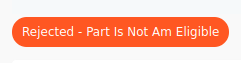
→ rejected, status will be changed to "REJECTED - PART IS NOT AM ELIGIBLE"

-
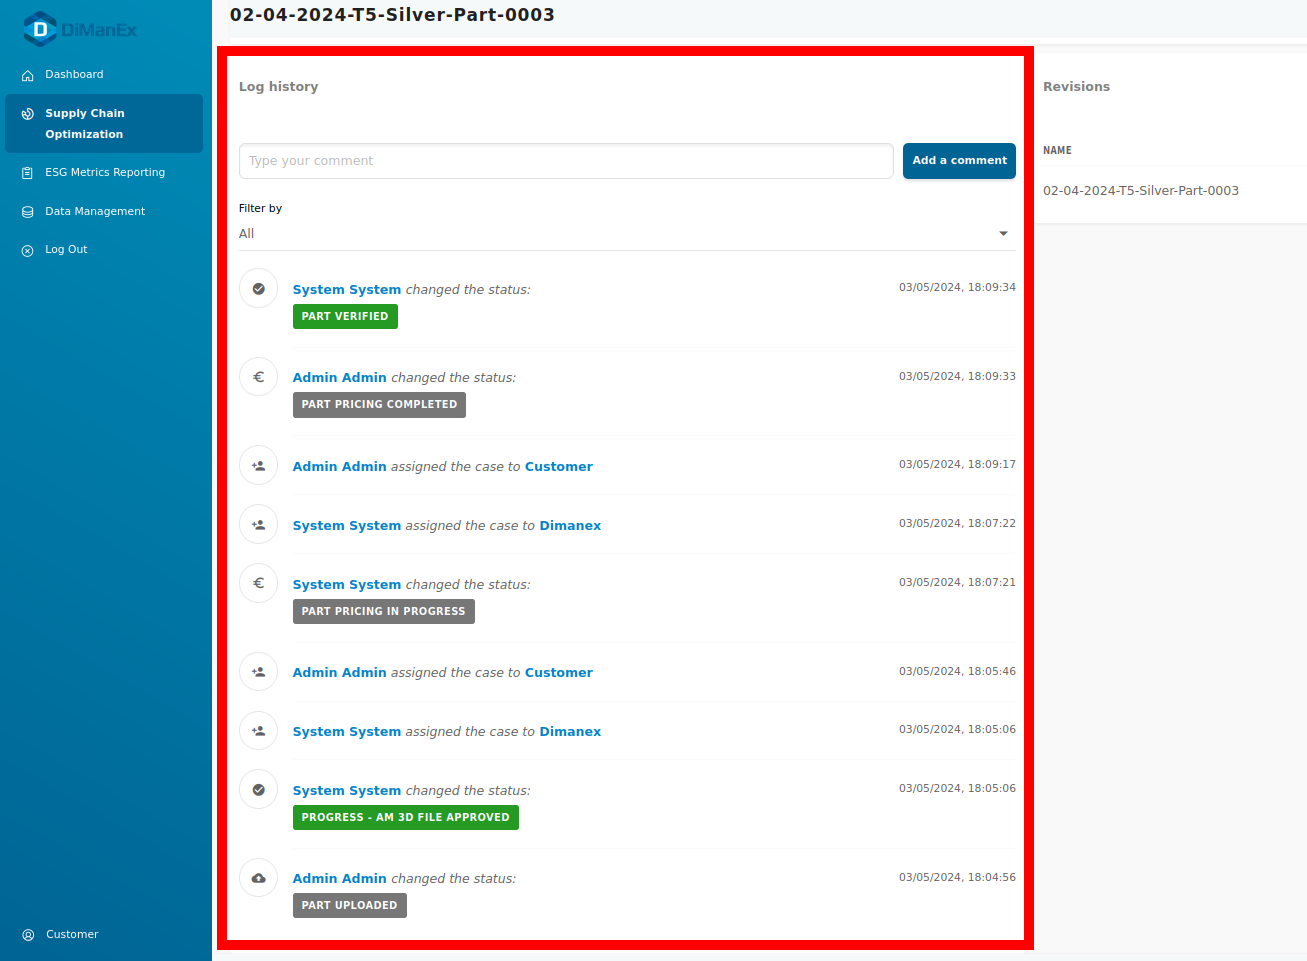
In the part’s details view, the workflow history area can be used to see all the status changes and actions taken during the digitization process.
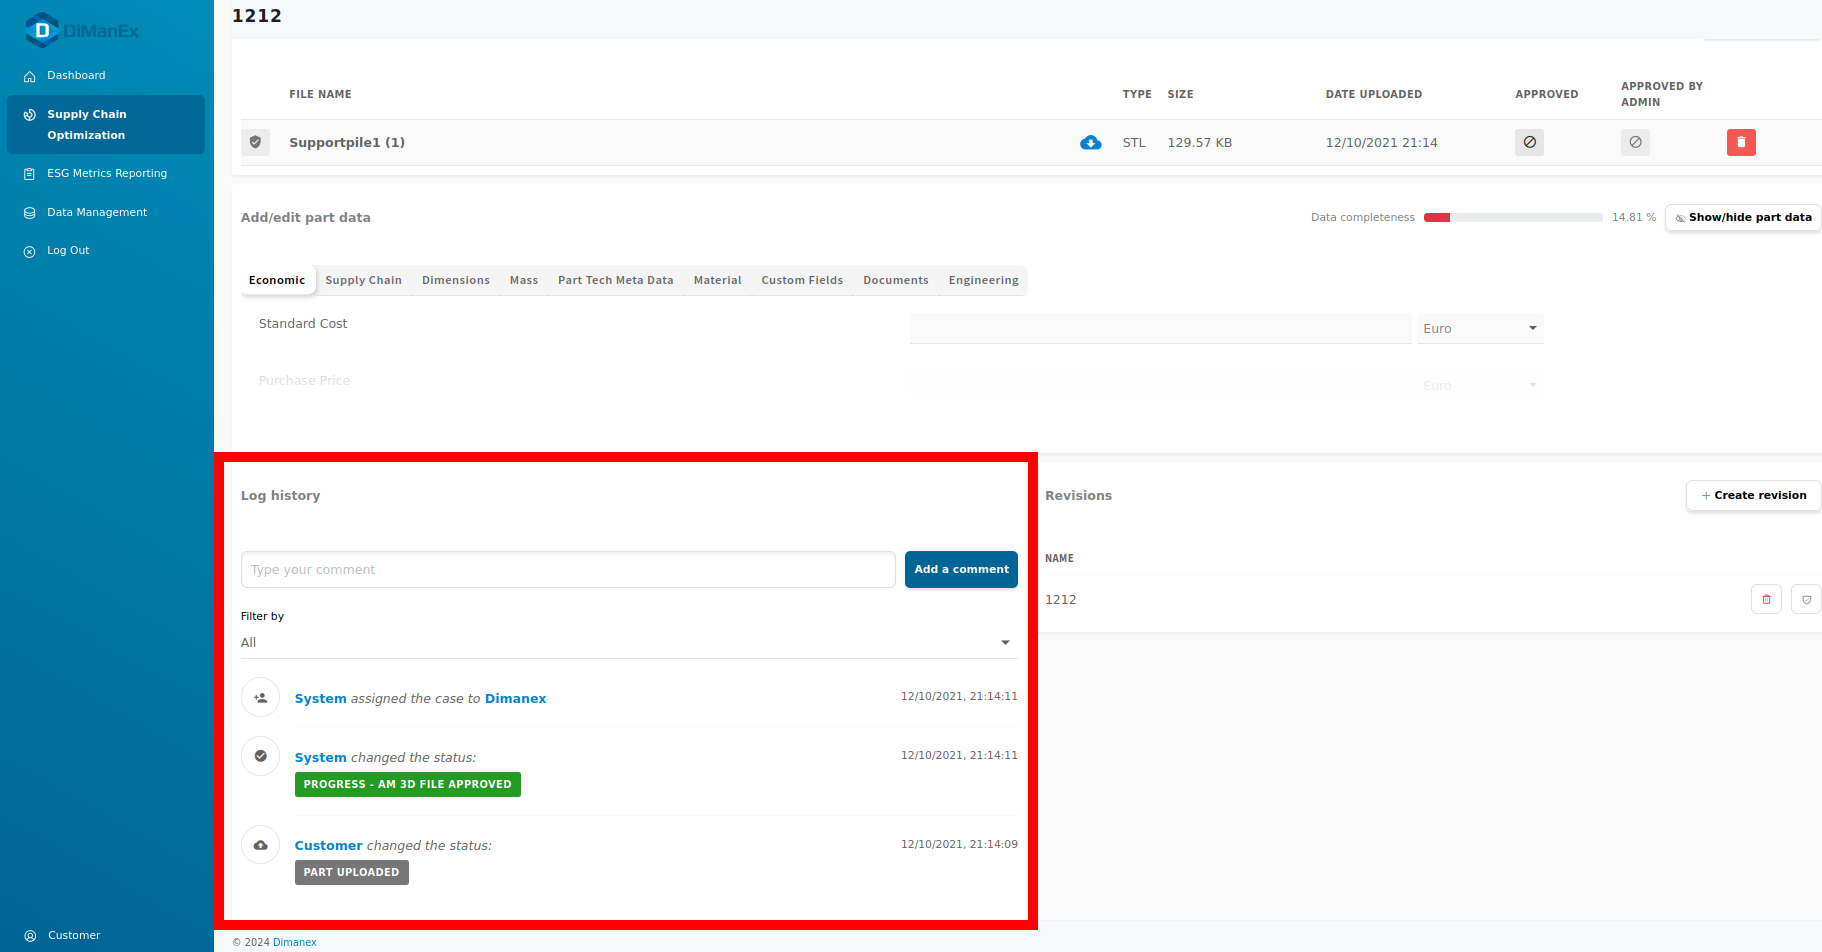
API Based
— API to get the log history:
GET ⇒ /api/workflows/{threadId}/history
-
Query Parameters
-
threadIdas a String value
-
-
Request Body
[ EMPTY ]
— API to add comments to the log history:
PATCH ⇒ /api/workflows/{threadId}/parts/comments
-
Query Parameters
-
threadIdas a String value
-
-
Request Body
{
  "comment": "String"
}
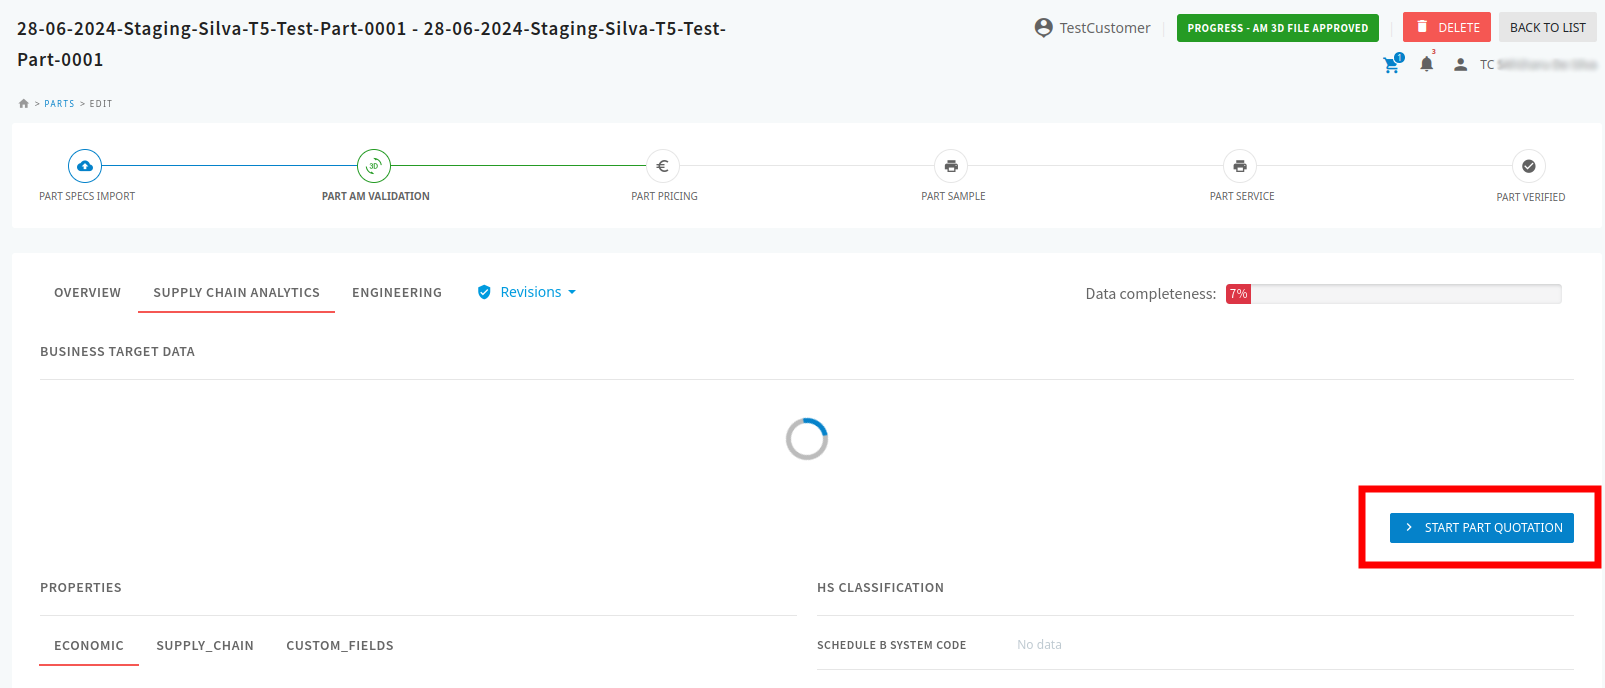
3.3. Quoting
The quoting process allows users to request a quote for a part and start the pricing process. The APIs related to quoting enable developers to programmatically interact with this process.
UI Based
-
Once the files are approved, navigate to a part’s details view.
-
Go to either 'Supply Chain Analytics' or 'Engineering' tab.
-
Click on 'Start Part Quotation'.
[ TO BE RE-PLACED BY THE SCREENSHOTS FROM THE NEW UI ]
-
Monitor any status changes here:
-
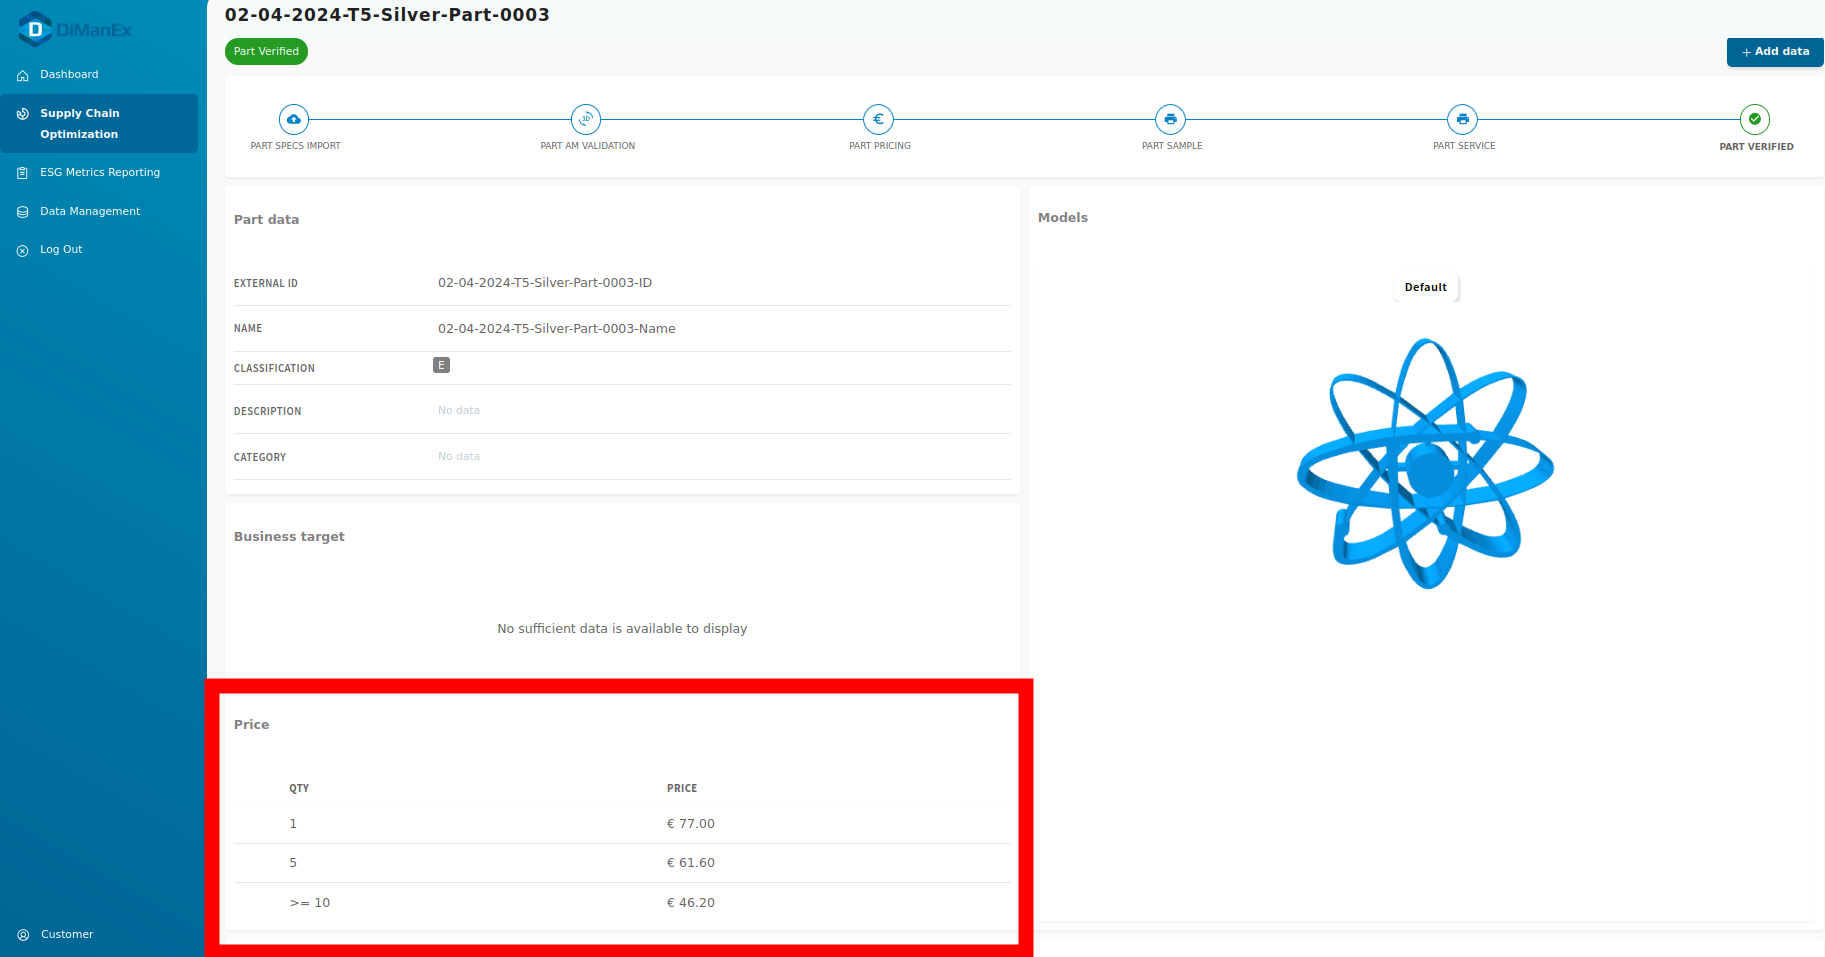
The list of quoted prices will be displayed here:
-
In the part’s details view, the workflow history area can be used to see all the status changes and actions taken during the quoting process.
API Based
— API to request a quotation:
POST ⇒ /api/bpm/parts/{id}/quotation/start
-
Query Parameters
-
idas a String value
-
-
Request Body
{
  "comment": "string",
  "empty": true
}
— API to get the current status of the part:
GET ⇒ /api/parts/{id}
-
Query Parameters
-
idas a String value -
fullNestingas a Boolean value -
plusHeavyFieldsas a String value
-
-
Request Body
[ EMPTY ]
— API to view the quoted price list:
POST ⇒ /api/erp/parts-prices/{partId}/price-list-rate
-
Query Parameters
-
partIdas a String value
-
-
Request Body
[ EMPTY ]
— API to get the workflow history:
GET ⇒ /api/workflows/{threadId}/history
-
Query Parameters
-
threadIdas a String value
-
-
Request Body
[ EMPTY ]
— API to add comments to the log history:
PATCH ⇒ /api/workflows/{threadId}/parts/comments
-
Query Parameters
-
threadIdas a String value
-
-
Request Body
{
  "comment": "String"
}
3.4. Ordering
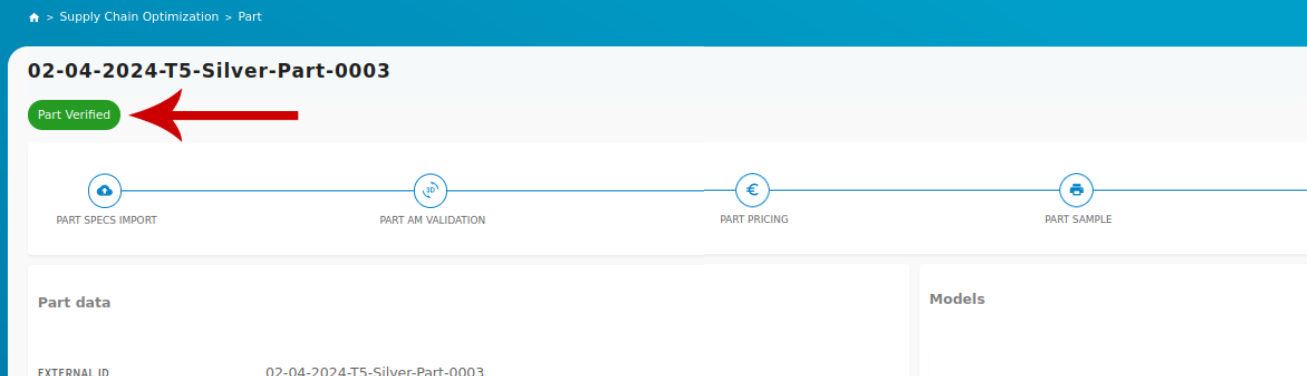
The ordering process allows users to place orders for parts based on an existing accepted quote. There are two main types of orders: Sample Orders and Print Orders. If a part is already verified, users can directly place Print Orders. However, if a part has not been previously verified, it will be required to initiate a Sample Order first. Upon receiving approval for the Sample Order, they can then proceed to place a Print Order for the respective part.
UI Based
Sample Order UIs
-
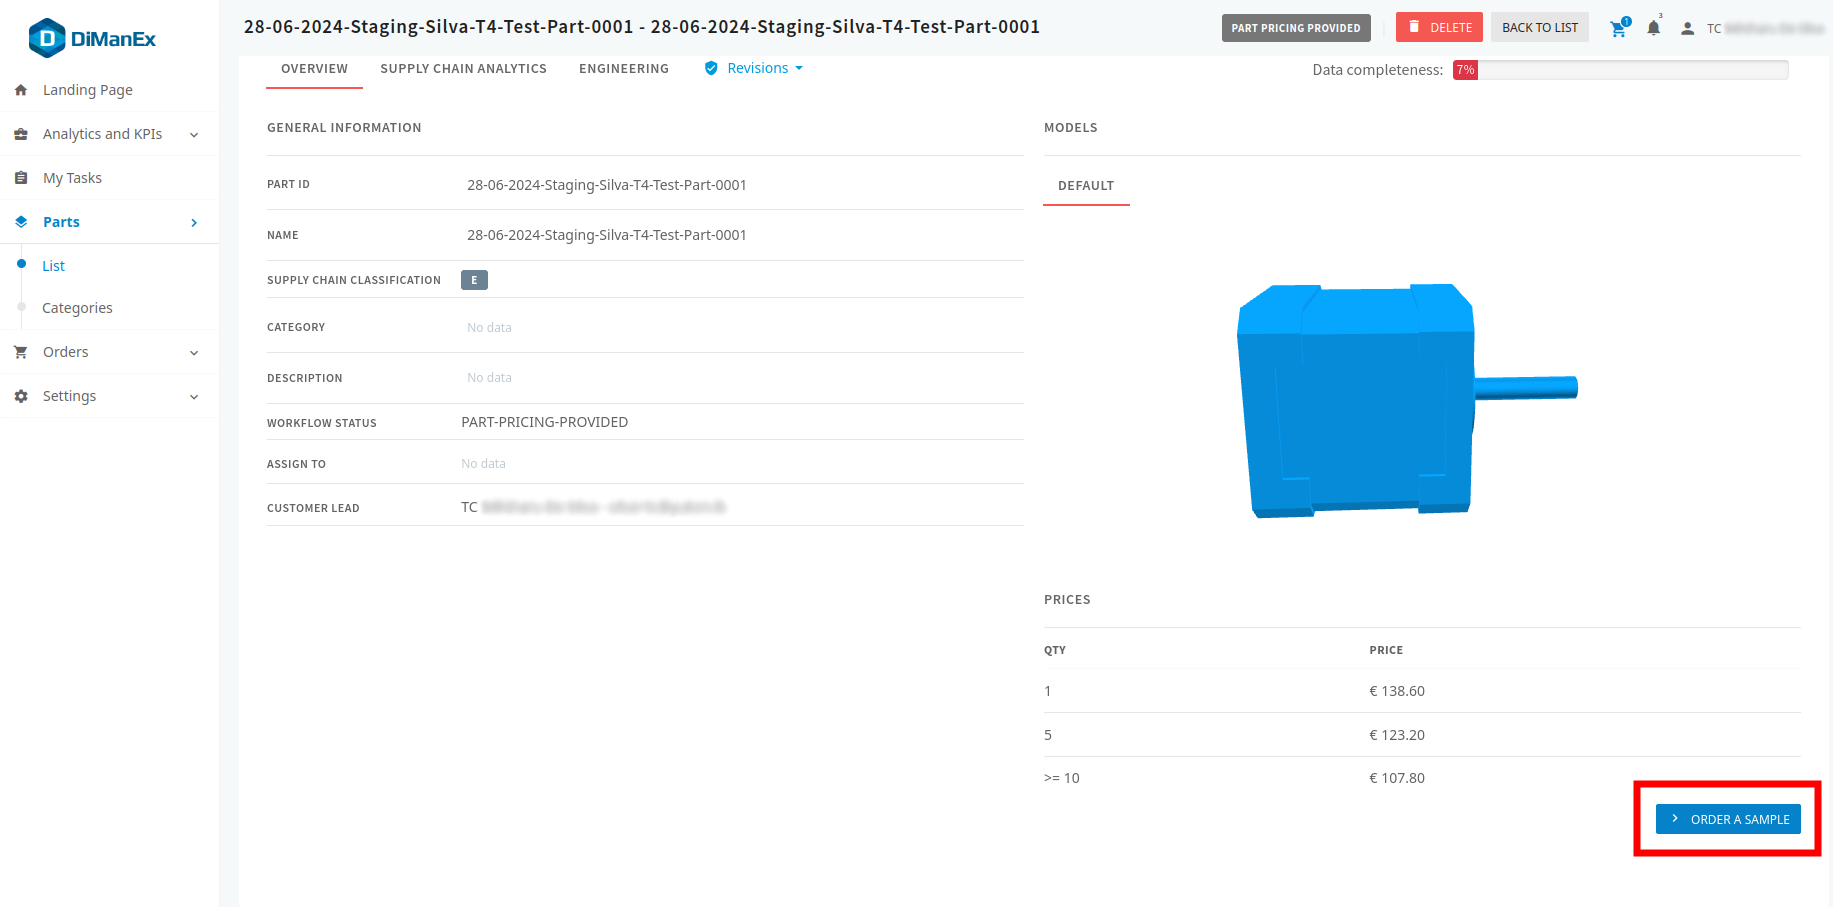
After prices are provided for a part, a 'Order A Sample' button will appear in the part details view to place a sample order.
[ TO BE RE-PLACED BY THE SCREENSHOTS FROM THE NEW UI ]
-
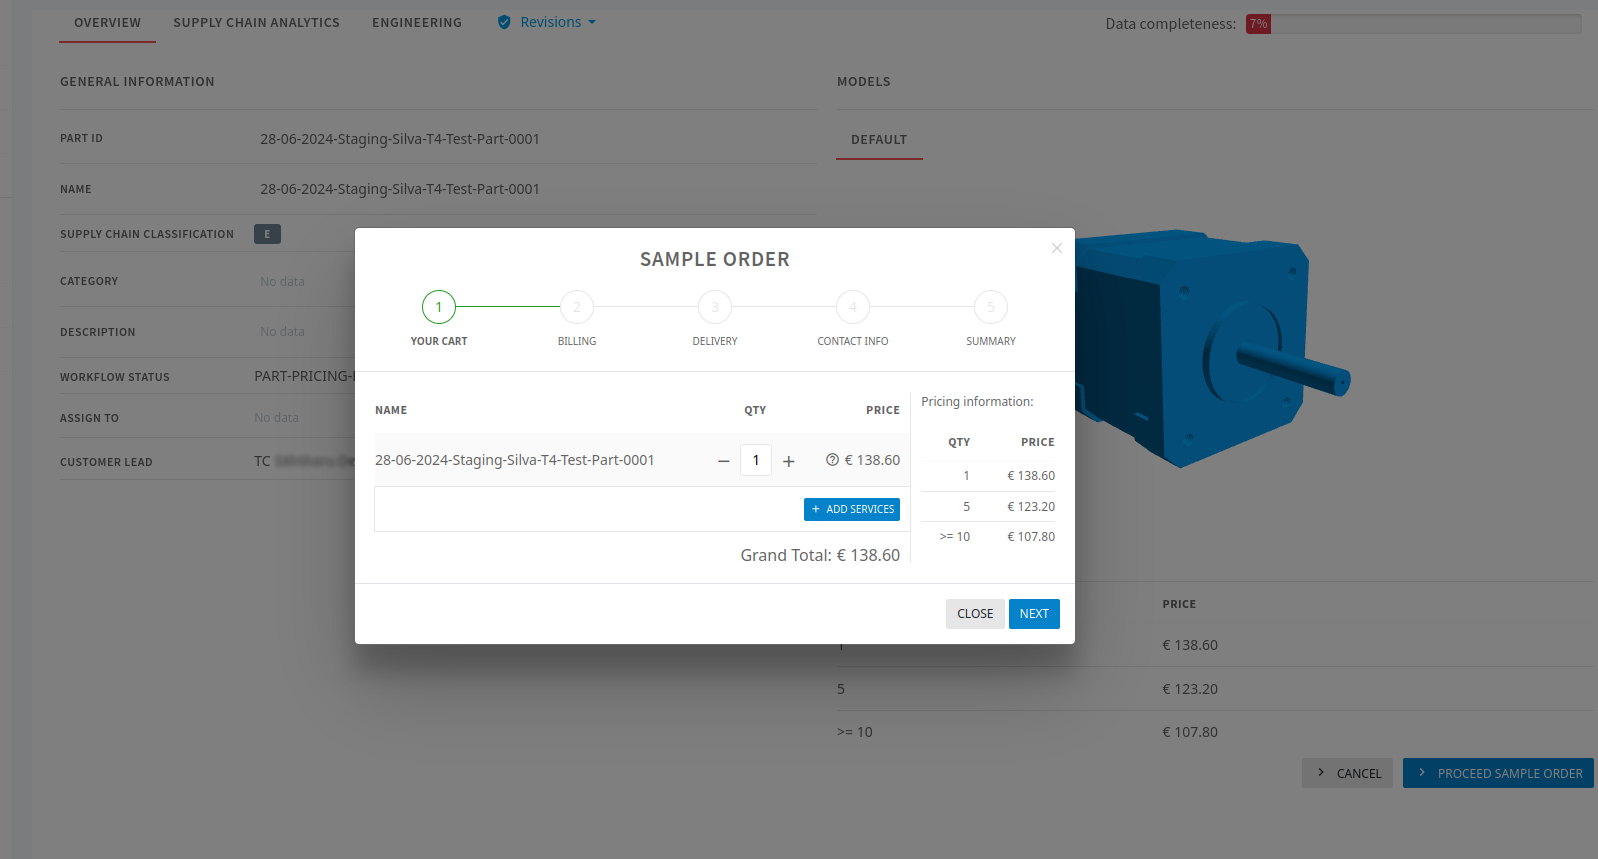
The sample order wizard will display the relevant order details, including pricing information.
[ TO BE RE-PLACED BY THE SCREENSHOTS FROM THE NEW UI ]
-
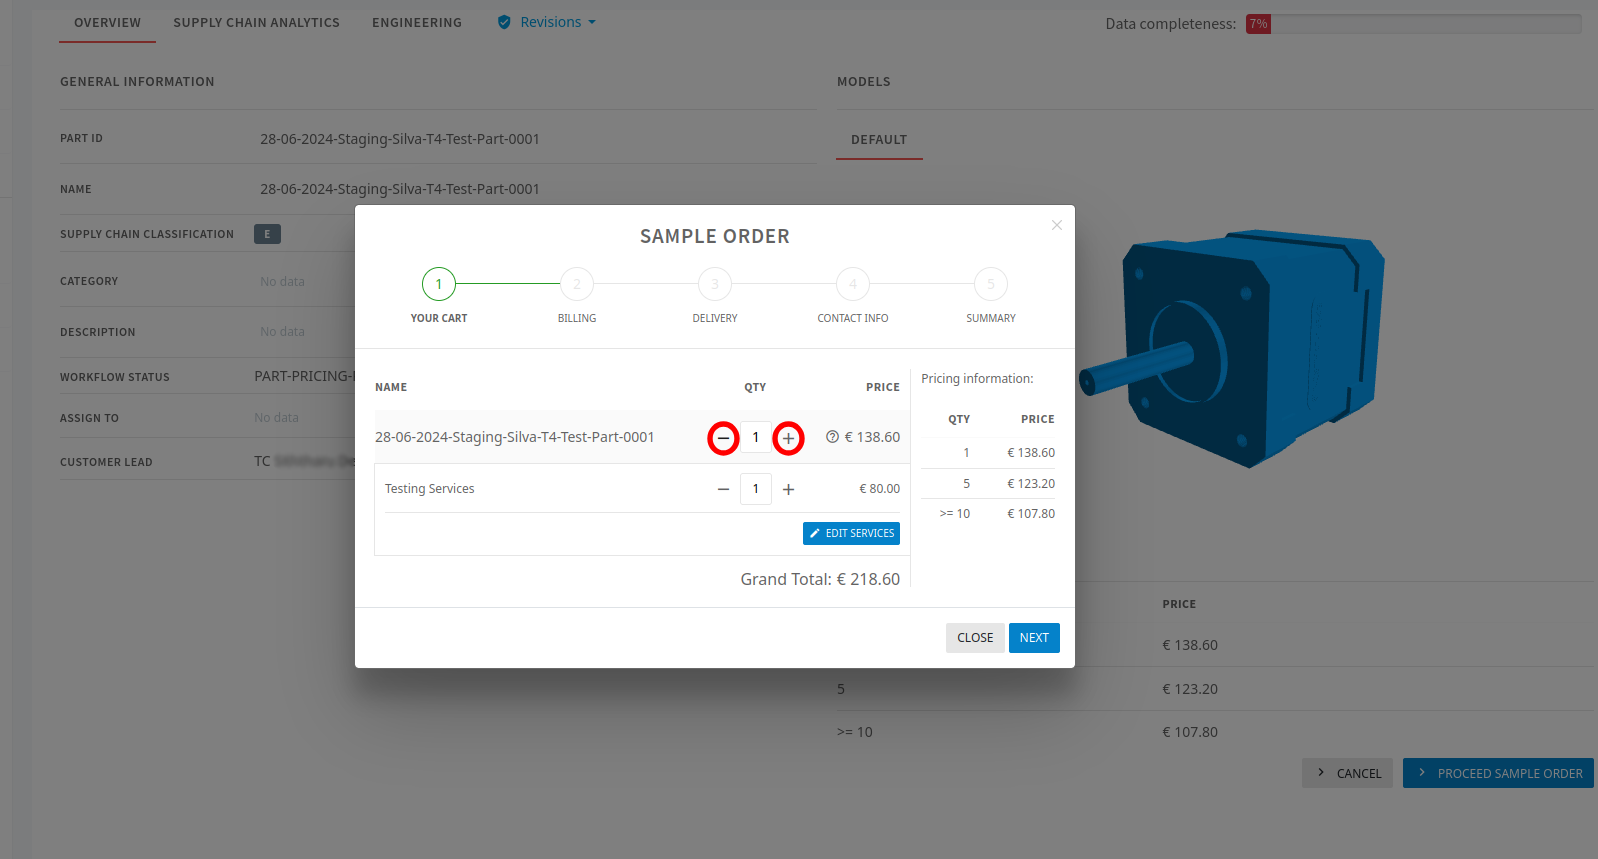
Click on the 'Add Services' button to include additional services in the order.
[ TO BE RE-PLACED BY THE SCREENSHOTS FROM THE NEW UI ]

-
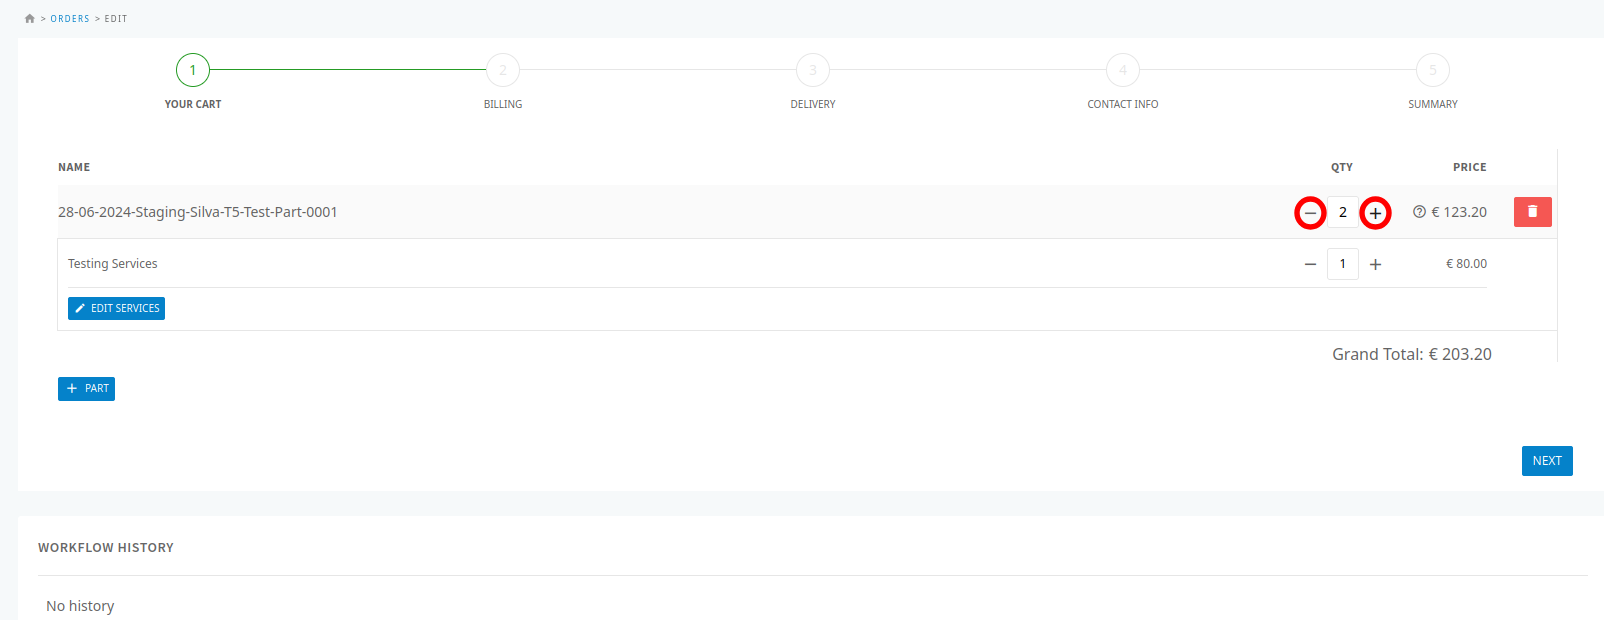
Adjust the quantity for both parts and services by clicking the '+' or '-' components under the 'QTY' column.
[ TO BE RE-PLACED BY THE SCREENSHOTS FROM THE NEW UI ]
-
Clicking 'Next' will proceed to the billing step.
-
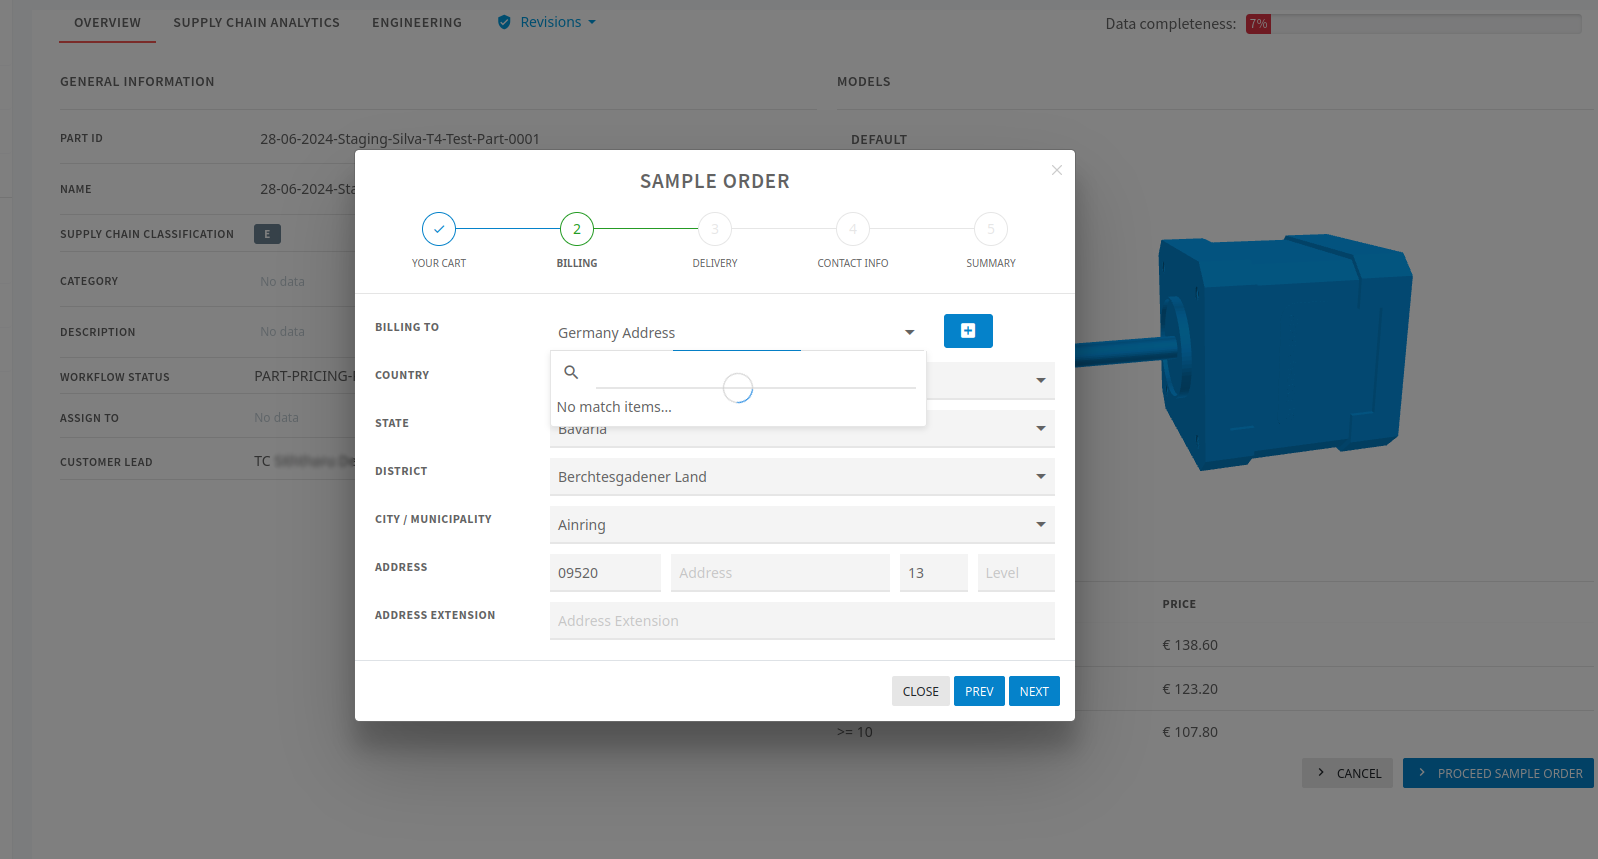
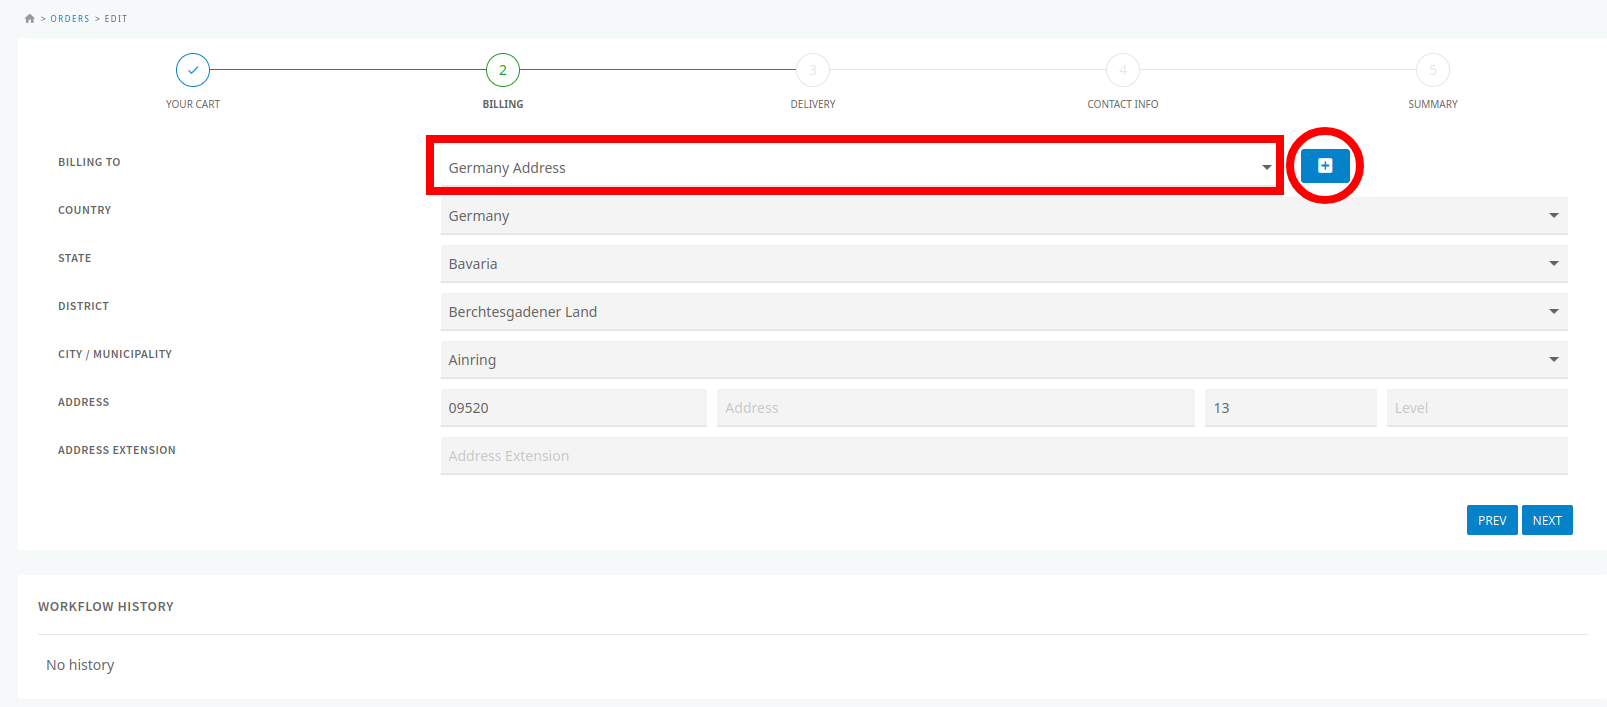
In the billing step, choose an existing billing address from the dropdown list labeled "Billing To", or create a new one by clicking the "+" button next to the dropdown list.
[ TO BE RE-PLACED BY THE SCREENSHOTS FROM THE NEW UI ]
-
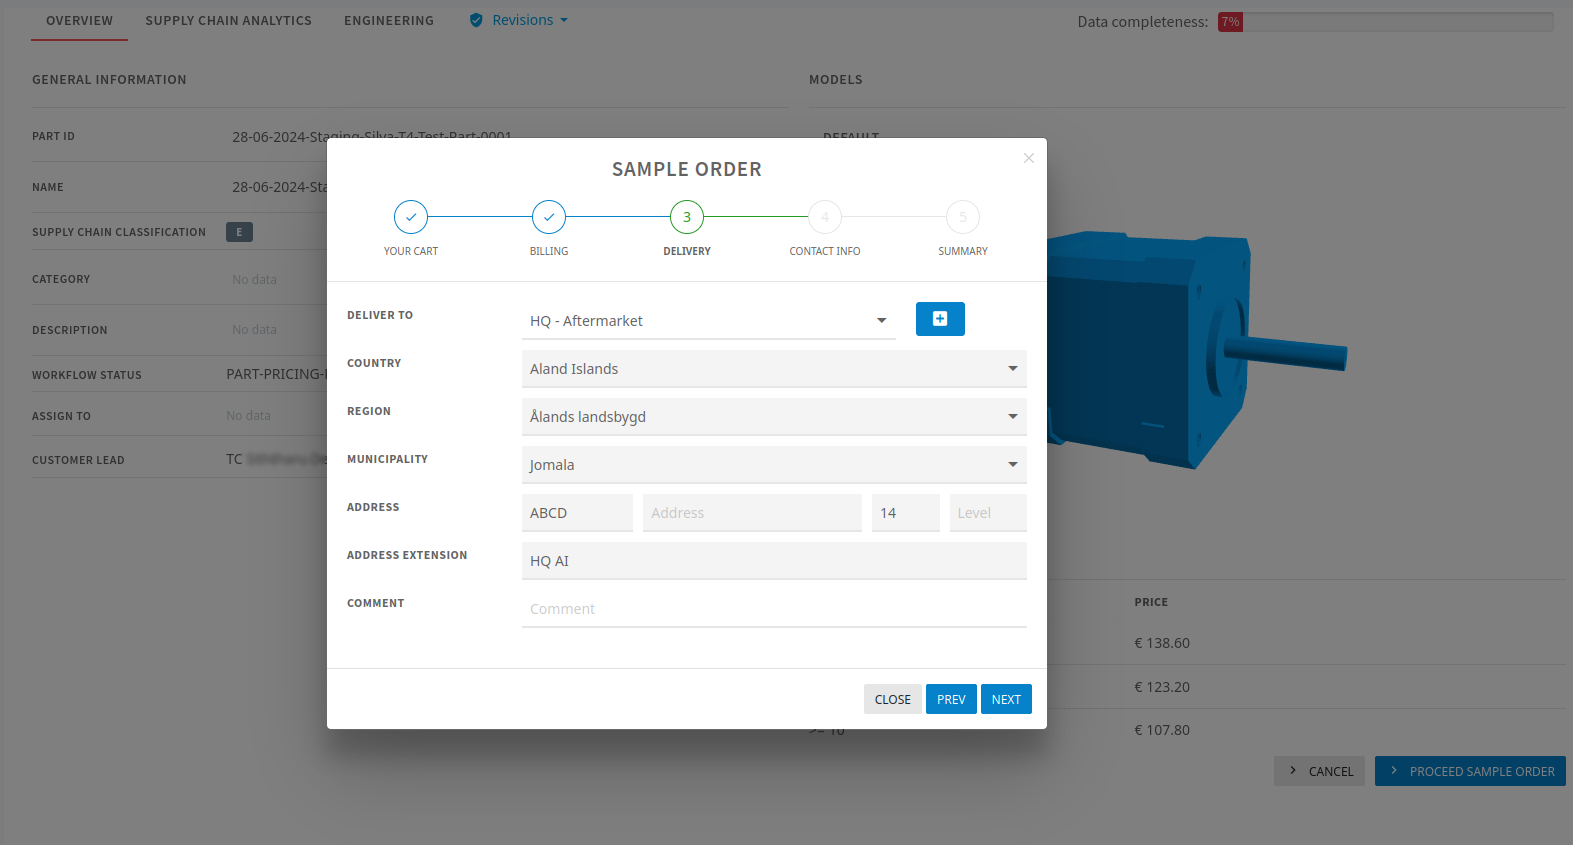
Click 'Next' to proceed to the delivery address step. Here, you can select an existing delivery address or create a new one.
[ TO BE RE-PLACED BY THE SCREENSHOTS FROM THE NEW UI ]
-
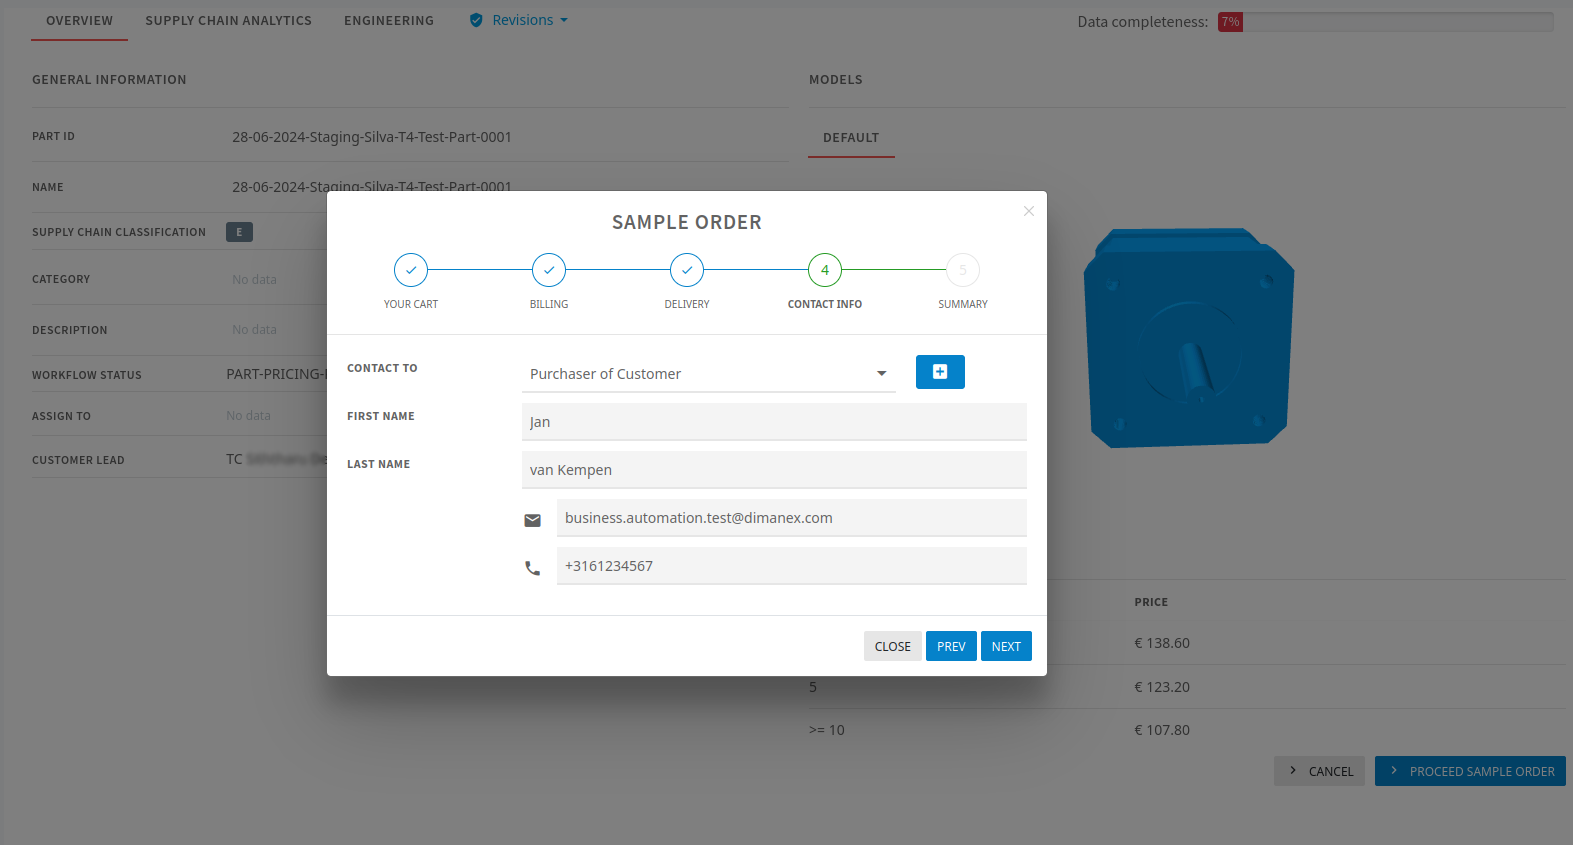
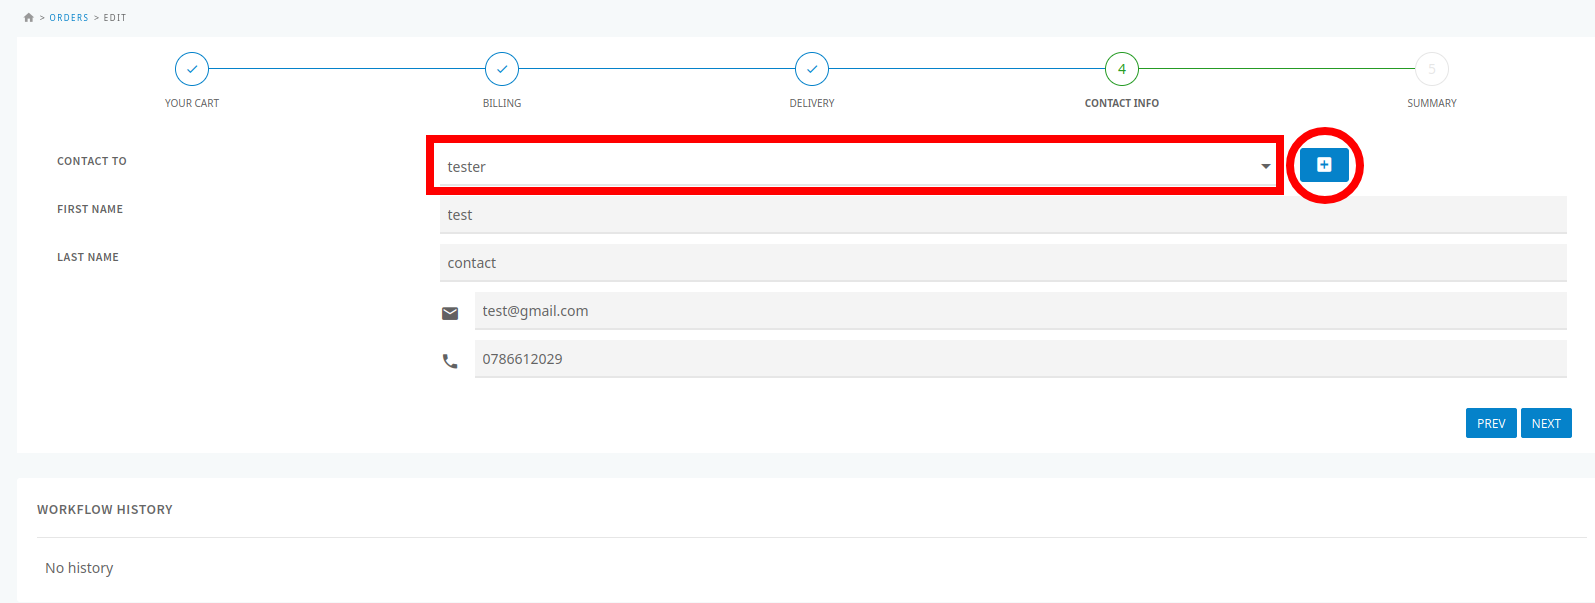
Click 'Next' to proceed to providing contact information. Choose existing contact info or create new contact details.
[ TO BE RE-PLACED BY THE SCREENSHOTS FROM THE NEW UI ]
-
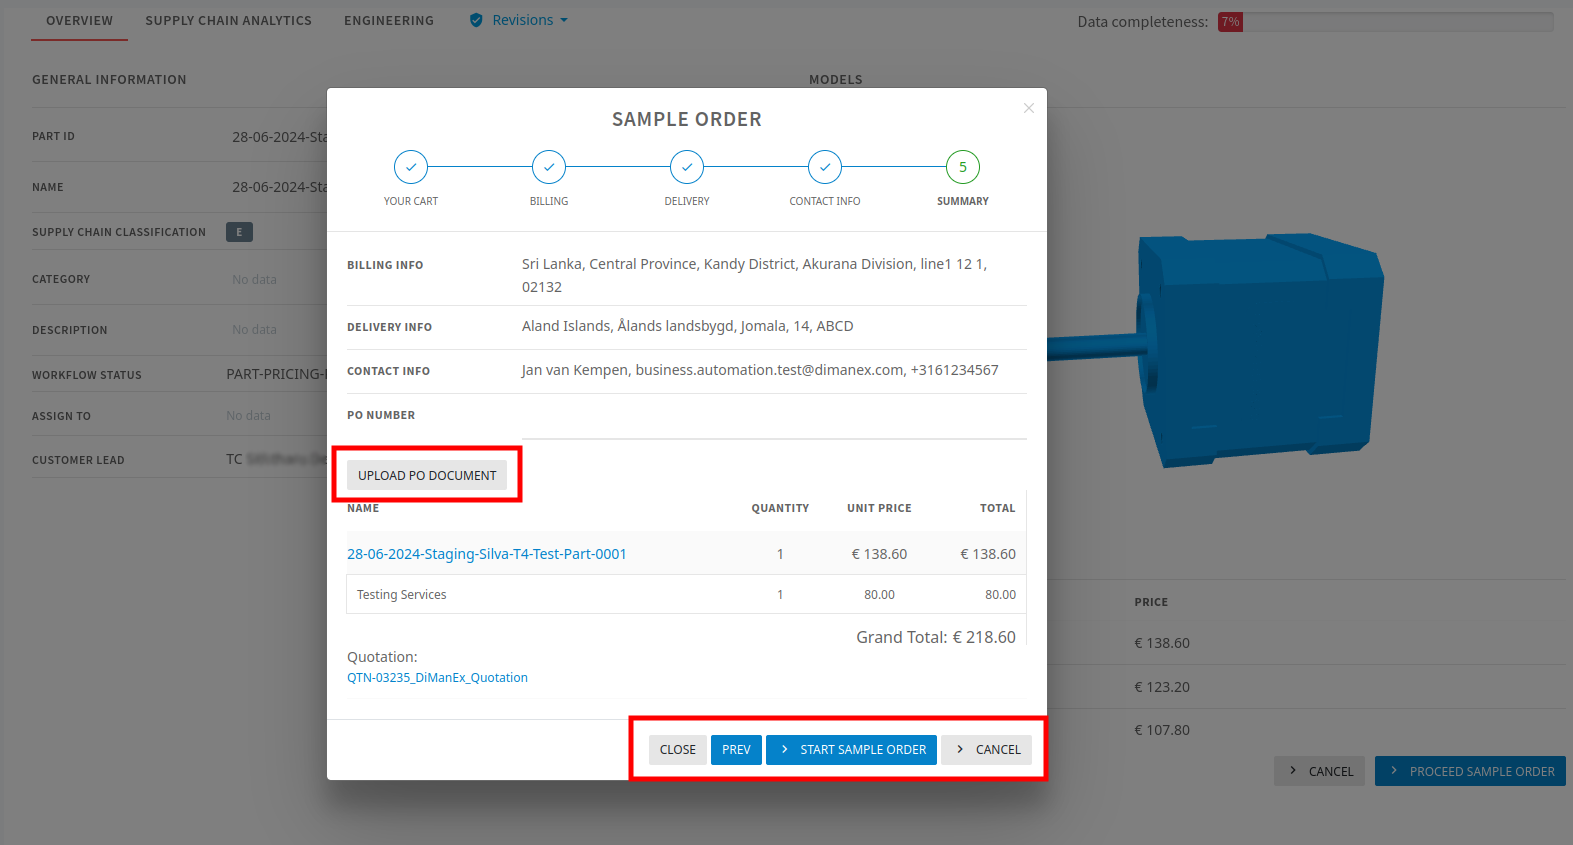
Click 'Next' to finalize and start/place the sample order.
[ TO BE RE-PLACED BY THE SCREENSHOTS FROM THE NEW UI ]
-
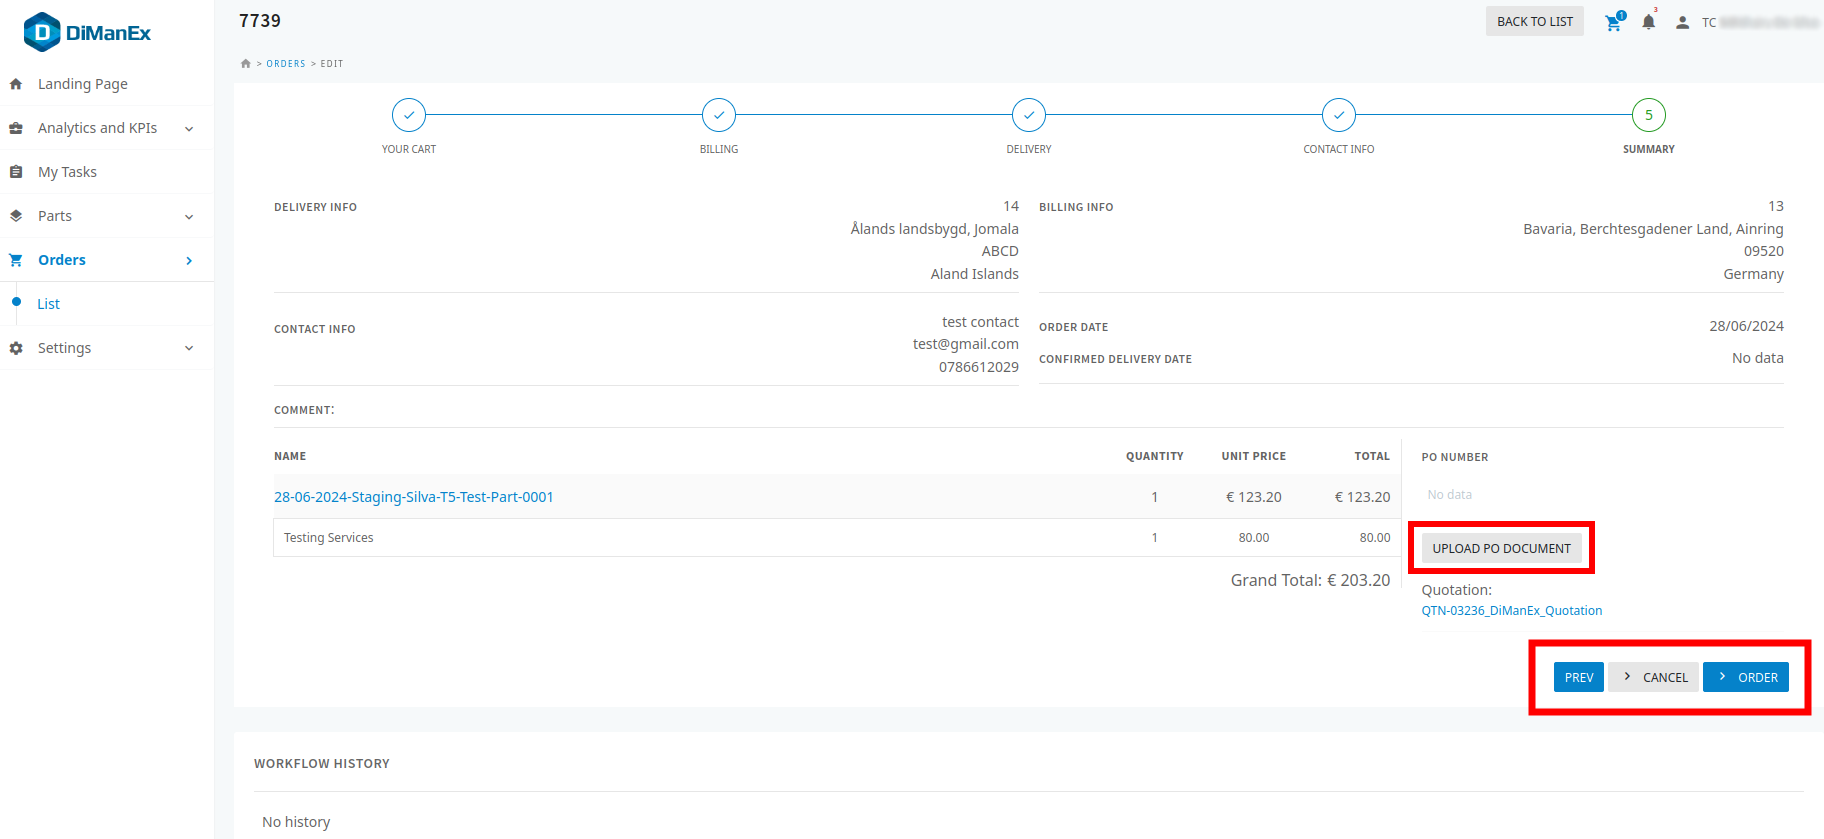
Provide a "PO Number" and upload a purchase order document if necessary : Corresponding API.
-
Alternatively, cancel the sample order by clicking 'Cancel' : Corresponding API.
-
Review the order details before clicking 'Start Sample Order' : Corresponding API.
-
Continue reading here: Process after placing an order.
Print Order UIs
-
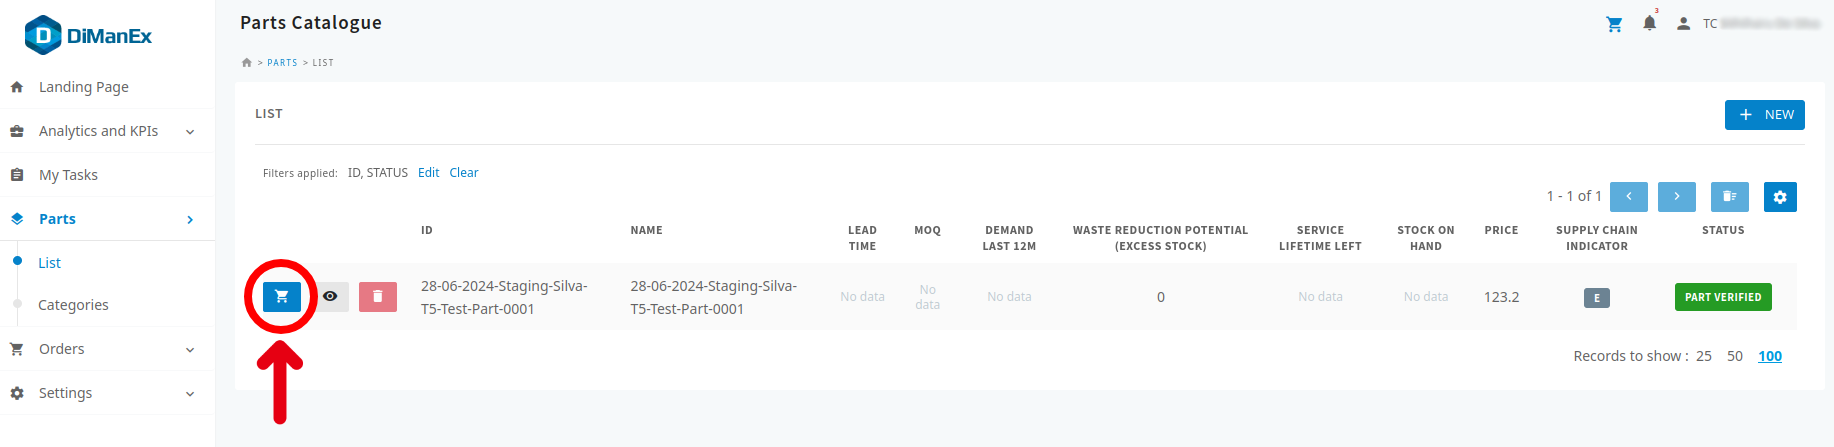
To initiate the print order process, go to the parts list view > click on the blue cart icon for each part that needs to be ordered. This action adds the relevant parts to the order basket.
[ TO BE RE-PLACED BY THE SCREENSHOTS FROM THE NEW UI ]
-
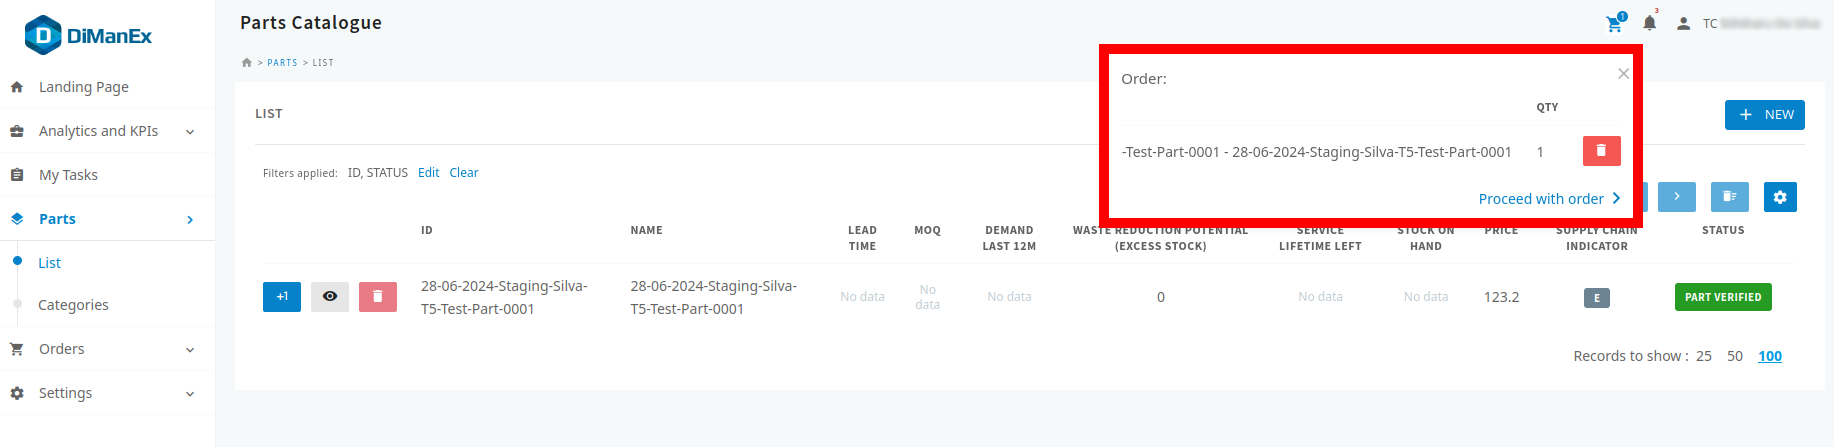
Once the part(s) are in the order basket, click on the cart icon at the top right corner. This opens a small box displaying the selected parts for ordering, including a delete button (red bin icon) and a link labeled 'Proceed with order' to begin the ordering process.
[ TO BE RE-PLACED BY THE SCREENSHOTS FROM THE NEW UI ]
-
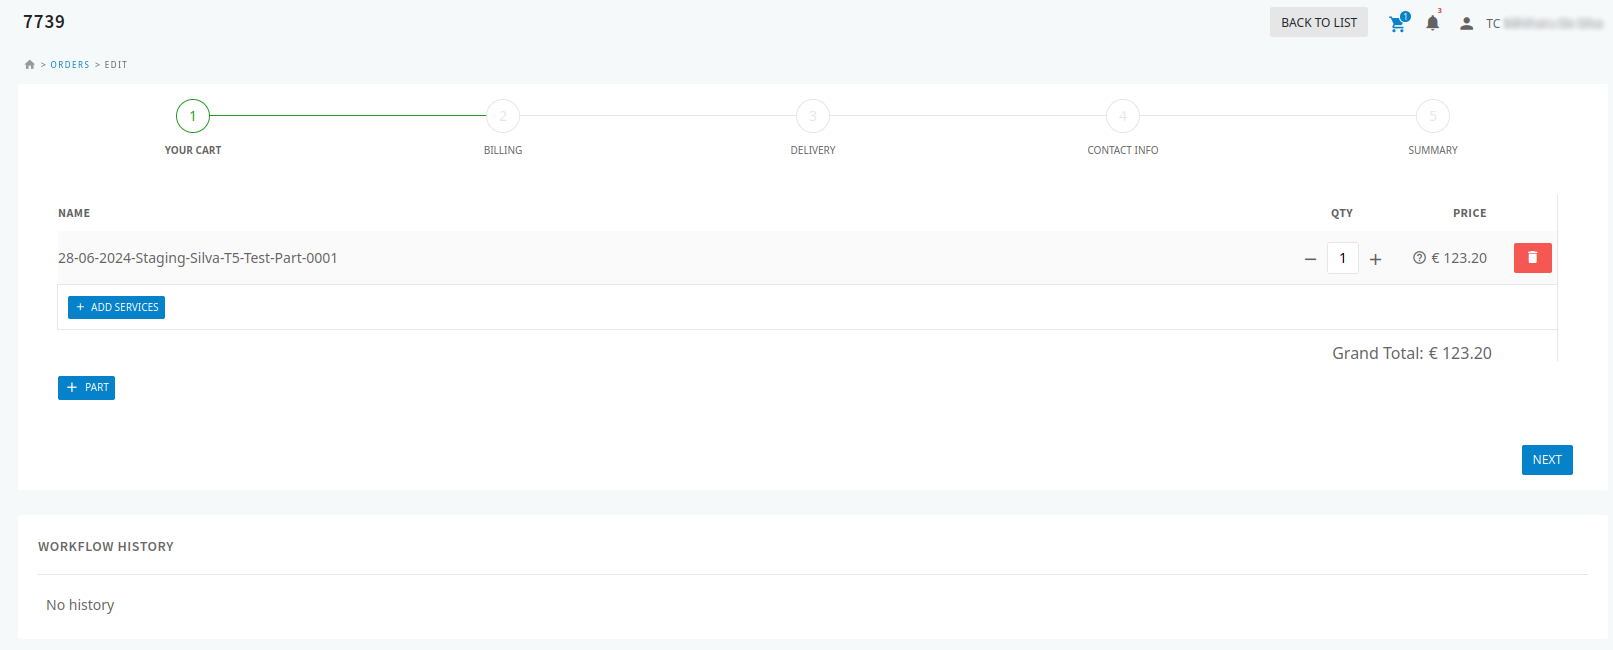
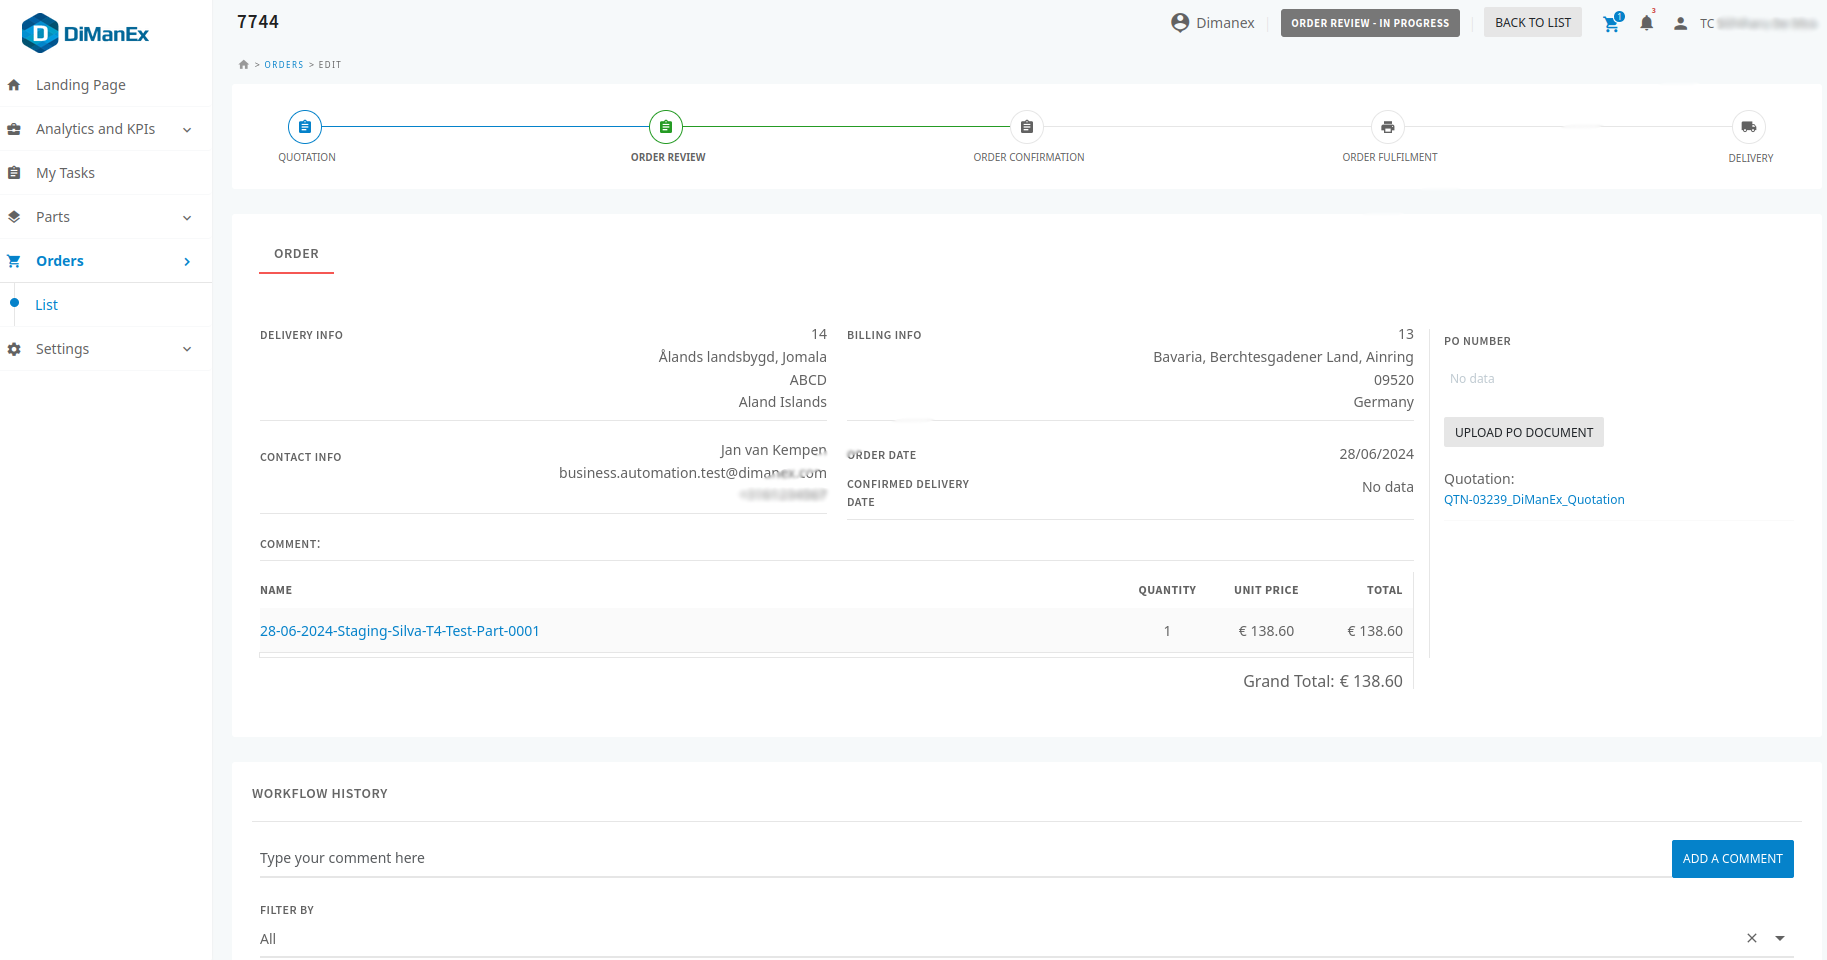
Clicking on 'Proceed with order' redirects to the order details view, showing relevant order details including workflow history.
[ TO BE RE-PLACED BY THE SCREENSHOTS FROM THE NEW UI ]
Corresponding API 1 | Corresponding API 2 | Corresponding API 3 | Corresponding API 4 | Corresponding API 5
-
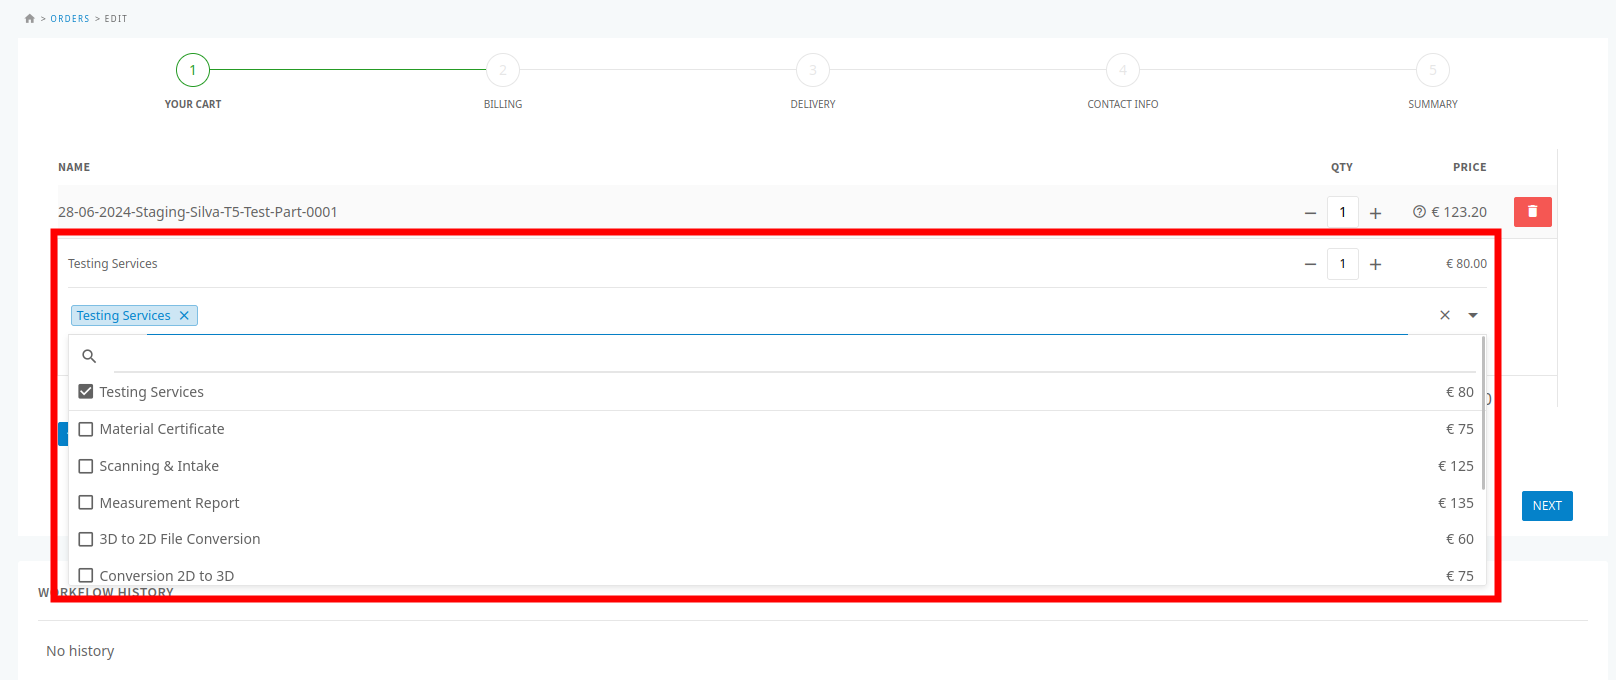
Click on 'Add Services' to include additional services in the order.
[ TO BE RE-PLACED BY THE SCREENSHOTS FROM THE NEW UI ]
-
Adjust the quantity for both parts and services by clicking the '+' or '-' components under the 'QTY' column.
[ TO BE RE-PLACED BY THE SCREENSHOTS FROM THE NEW UI ]
-
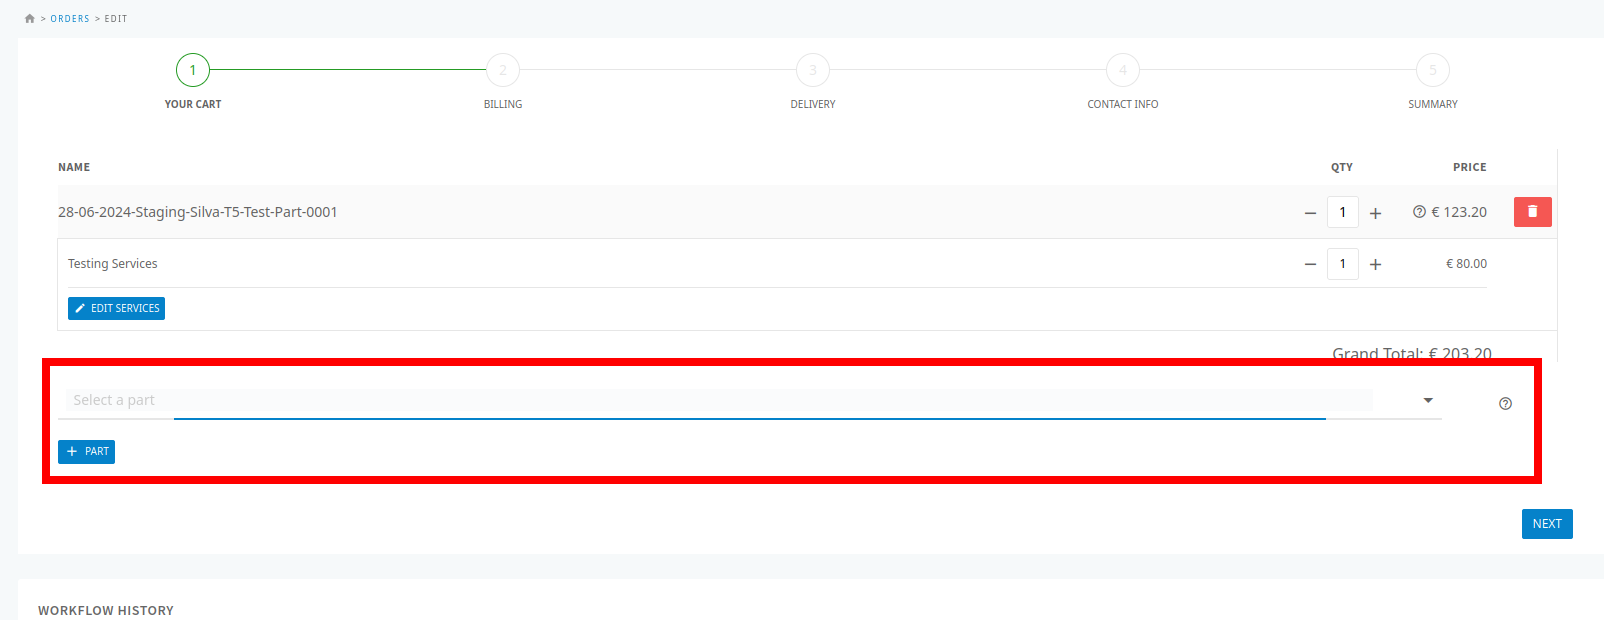
Click on 'Part' to add more parts to the order.
[ TO BE RE-PLACED BY THE SCREENSHOTS FROM THE NEW UI ]
-
Use the delete button (red bin icon) to remove parts from the order.
-
Click 'Next' to proceed to the billing step.
-
In the billing step, choose an existing billing address from the dropdown list labeled "Billing To", or create a new one by clicking the "+" button next to the dropdown list.
[ TO BE RE-PLACED BY THE SCREENSHOTS FROM THE NEW UI ]
-
Click 'Next' to proceed to the delivery address step. Here, you can select an existing delivery address or create a new one.
[ TO BE RE-PLACED BY THE SCREENSHOTS FROM THE NEW UI ]

-
Click 'Next' to proceed to providing contact information. Choose existing contact info or create new contact details.
[ TO BE RE-PLACED BY THE SCREENSHOTS FROM THE NEW UI ]
-
Click 'Next' to finalize and place the print order.
[ TO BE RE-PLACED BY THE SCREENSHOTS FROM THE NEW UI ]
-
Provide a "PO Number" and upload a purchase order document if necessary : Corresponding API.
-
Alternatively, cancel the print order by clicking 'Cancel' : Corresponding API.
-
Review the order details before clicking 'Order' : Corresponding API.
-
Continue reading here: Process after placing an order.
UIs Common for Both Sample and Print Orders
-
Once a sample or print order is placed, go to the order details view.
[ TO BE RE-PLACED BY THE SCREENSHOTS FROM THE NEW UI ]
-
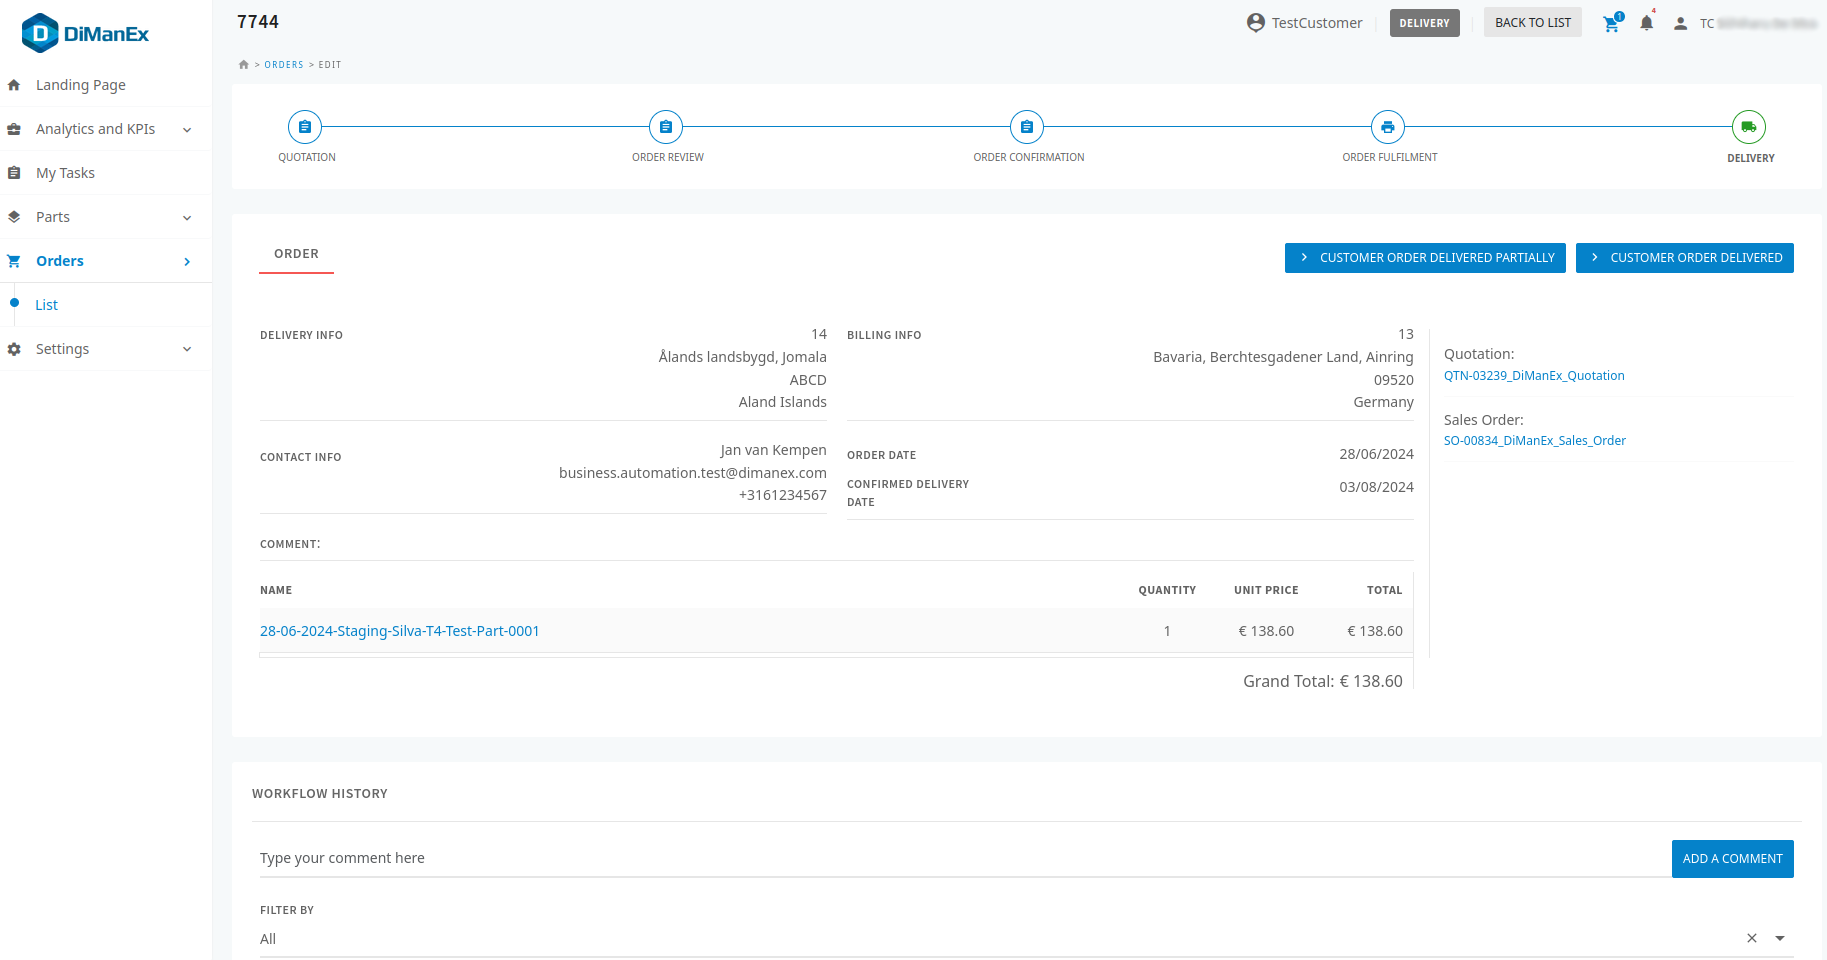
Once the order is accepted and shipped, two buttons, 'Customer Order Delivered Partially' and 'Customer Order Delivered', will appear to let the customer confirm whether the order is partially or fully delivered.
[ TO BE RE-PLACED BY THE SCREENSHOTS FROM THE NEW UI ]
-
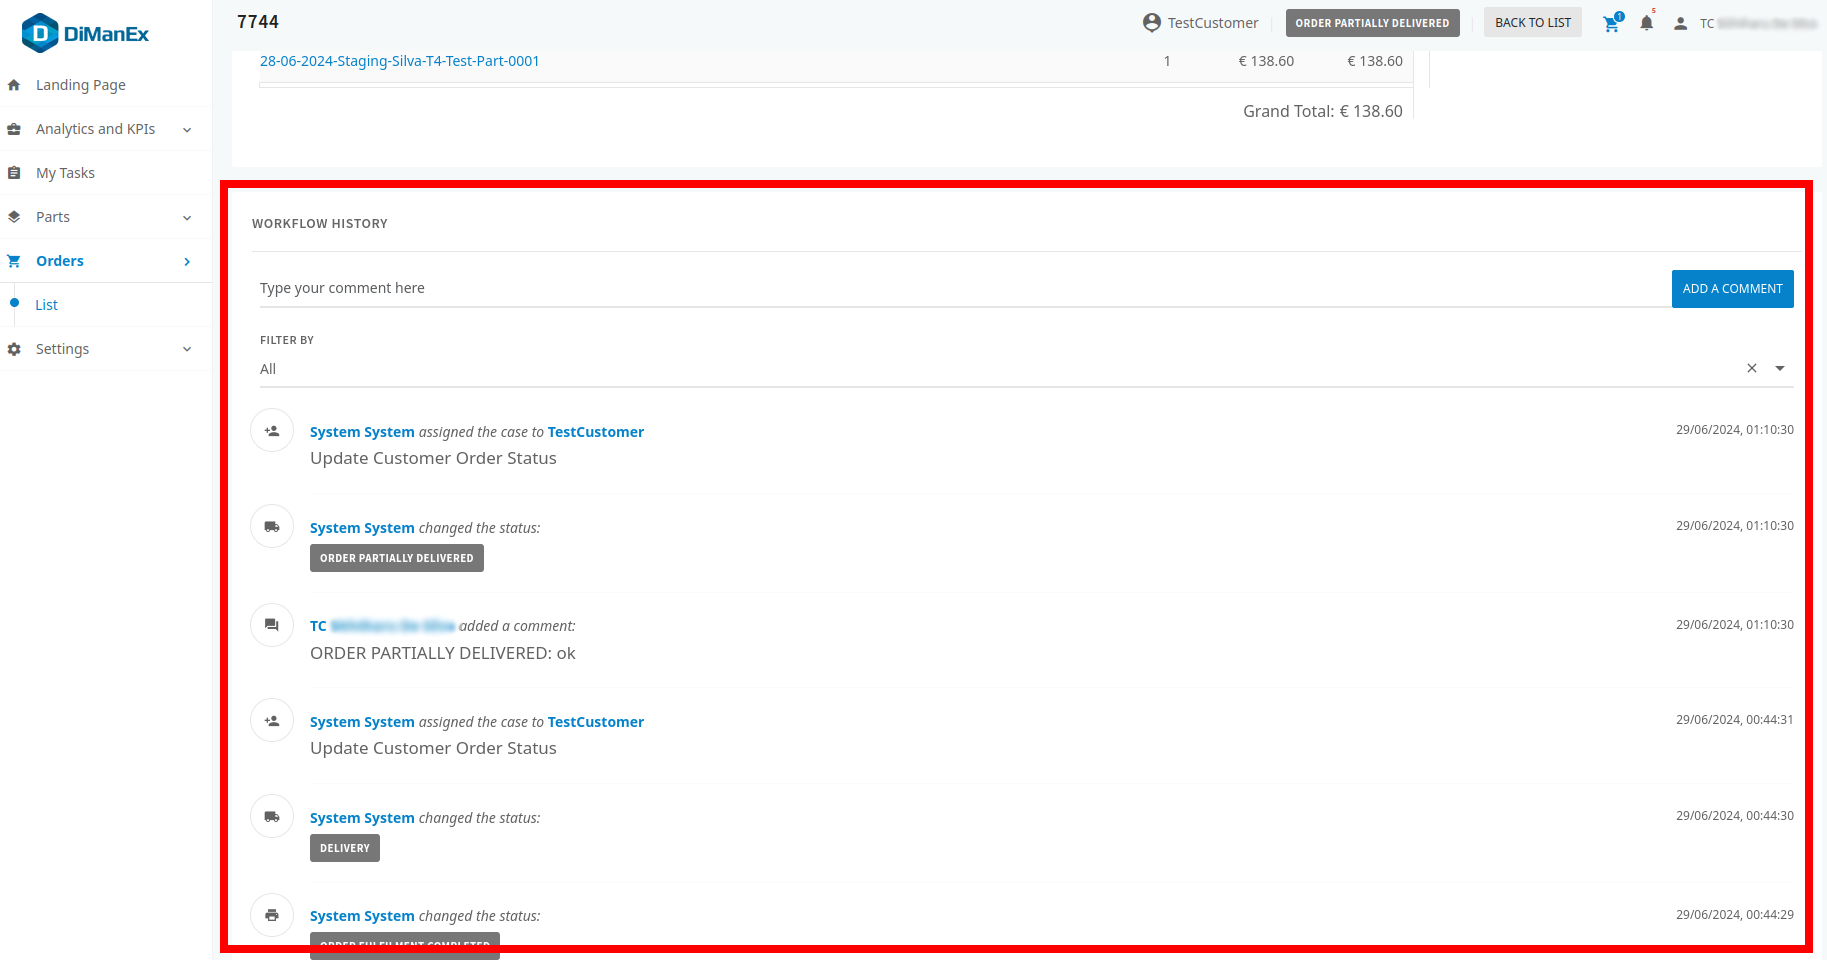
In the order’s details view, the workflow history area can be used to see all the status changes and actions taken during the ordering process.
[ TO BE RE-PLACED BY THE SCREENSHOTS FROM THE NEW UI ]
API Based
Sample Orders APIs
— API to open a sample order:
POST ⇒ /api/customer-orders/sample/{partId}
-
Query Parameters
-
partIdas a String value
-
-
Request Body
[ EMPTY ]
— API to get sample order details:
GET ⇒ /api/customer-orders/sample/{partId}
-
Query Parameters
-
partIdas a String value
-
-
Request Body
[ EMPTY ]
— API to start/place a sample order:
POST ⇒ /api/bpm/parts/sample-orders/{sampleOrderId}/start
-
Query Parameters
-
sampleOrderIdas a String value
-
-
Request Body
[ EMPTY ]
Print Order APIs
— API to open a print order:
POST ⇒ /api/customer-orders/part
-
Query Parameters
[ No Parameters ]
-
Request Body
{
  "quantity": 2147483647,
  "lineNumber": 0,
  "priceListRate": 0,
  "priceListRateWithMargin": 0,
  "price": 0,
  "total": 0,
  "margin": 0,
  "discount": 0,
  "validFrom": 0,
  "validUpto": 0,
  "fileInfo": [
    {
      "fileUrl": "string",
      "fileType": "string",
      "fileName": "string",
      "officialStl": true,
      "approved": true,
      "approvedByAdmin": true,
      "size": 0,
      "created": 0
    }
  ],
  "machineInfo": [
    {
      "id": "string",
      "name": "string"
    }
  ],
  "materialInfo": {
    "id": "string",
    "name": "string"
  },
  "materialGroupInfo": {
    "id": "string",
    "name": "string"
  },
  "machineTechnologyInfo": {
    "id": "string",
    "name": "string"
  },
  "customerId": "string",
  "service": {
    "id": "string",
    "name": "string",
    "group": "string",
    "price": 0,
    "currency": {
      "name": "string",
      "symbol": "string"
    },
    "quantity": 2147483647
  },
  "color": {
    "id": 0,
    "ral": "string",
    "description": "string",
    "hex": "string",
    "rgb": "string",
    "sigma": "string",
    "pantone": "string",
    "createdAt": 0,
    "updatedAt": 0
  },
  "colo2": {
    "id": 0,
    "ral": "string",
    "description": "string",
    "hex": "string",
    "rgb": "string",
    "sigma": "string",
    "pantone": "string",
    "createdAt": 0,
    "updatedAt": 0
  },
  "color3": {
    "id": 0,
    "ral": "string",
    "description": "string",
    "hex": "string",
    "rgb": "string",
    "sigma": "string",
    "pantone": "string",
    "createdAt": 0,
    "updatedAt": 0
  },
  "color4": {
    "id": 0,
    "ral": "string",
    "description": "string",
    "hex": "string",
    "rgb": "string",
    "sigma": "string",
    "pantone": "string",
    "createdAt": 0,
    "updatedAt": 0
  },
  "color5": {
    "id": 0,
    "ral": "string",
    "description": "string",
    "hex": "string",
    "rgb": "string",
    "sigma": "string",
    "pantone": "string",
    "createdAt": 0,
    "updatedAt": 0
  },
  "currency": {
    "name": "string",
    "symbol": "string"
  },
  "confirmationReferenceNumber": "string",
  "rfqSupplierOrderId": "string",
  "economical": true,
  "id": "string",
  "name": "string",
  "externalId": "string"
}
— API to get all opened print orders:
GET ⇒ /api/customer-orders/opened
-
Query Parameters
No Parameters
-
Request Body
[ EMPTY ]
— API to remove an opened print order:
DELETE ⇒ /api/customer-orders/part/{partId}
-
Query Parameters
-
partIdas a String value
-
-
Request Body
[ EMPTY ]
— API to get workflow statuses:
GET ⇒ /api/workflows/statuses
-
Query Parameters
-
searchContextas an Object:{ "page": 0, "count": 0, "query": "workflowThreadsType=in=(CUSTOMER_ORDER)", "sort": "string" }
-
-
Request Body
[ EMPTY ]
— API to get price list:
GET ⇒ /api/erp/parts-prices/{partId}/price-list-rate
-
Query Parameters
-
partIdas a String value
-
-
Request Body
[ EMPTY ]
— APIs to get all parts:
GET ⇒ /api/parts
-
Query Parameters
-
fullNestingas a Boolean value-
Available values : true, false
-
Default value : false
-
-
plusHeavyFieldsas a String value -
searchContextas an Object:{ "page": 0, "count": 0, "query": "status=in=(1999);hasPrice==true", "sort": "partName" }
-
-
Request Body
[ EMPTY ]
— API to start/place a print order:
POST ⇒ /api/bpm/customer-orders/{customerOrderId}/open-order
-
Query Parameters
-
customerOrderIdas a String value
-
-
Request Body
[ EMPTY ]
APIs Common for Both Sample and Print Orders
— API to get the all services and add or update services in an order:
GET ⇒ /api/services
-
Query Parameters
-
searchContextas an Object:{ "page": 0, "count": 0, "query": "currency==EUR", "sort": "" }
-
-
Request Body
[ EMPTY ]
POST ⇒ /api/customer-orders/{id}/parts/{partId}/services
-
Query Parameters
-
idas a String value -
partIdas a String value
-
-
Request Body
{
  "id": "ITEM-00001",
  "name": "Testing Services",
  "group": "Test Group Services",
  "price": 80,
  "currency": {
    "name": "EUR",
    "symbol": "€"
  },
  "quantity": 1,
  "currencyAndPrice": "€ 80"
}
PATCH ⇒ /api/customer-orders/{id}/parts/{partId}/services
-
Query Parameters
-
idas a String value -
partIdas a String value-
Request Body
{
  "id": "ITEM-00001",
  "name": "Testing Services",
  "group": "Test Group Services",
  "price": 80,
  "currency": {
    "name": "EUR",
    "symbol": "€"
  },
  "quantity": 1,
  "currencyAndPrice": "€ 80"
}
-
-
— API to change quantity:
POST ⇒ /api/customer-orders/{id}/part/quantity
-
Query Parameters
-
idas a String value
-
-
Request Body
{
  "quantity": 2147483647,
  "lineNumber": 0,
  "priceListRate": 0,
  "priceListRateWithMargin": 0,
  "price": 0,
  "total": 0,
  "margin": 0,
  "discount": 0,
  "validFrom": 0,
  "validUpto": 0,
  "fileInfo": [
    {
      "fileUrl": "string",
      "fileType": "string",
      "fileName": "string",
      "officialStl": true,
      "approved": true,
      "approvedByAdmin": true,
      "size": 0,
      "created": 0
    }
  ],
  "machineInfo": [
    {
      "id": "string",
      "name": "string"
    }
  ],
  "materialInfo": {
    "id": "string",
    "name": "string"
  },
  "materialGroupInfo": {
    "id": "string",
    "name": "string"
  },
  "machineTechnologyInfo": {
    "id": "string",
    "name": "string"
  },
  "customerId": "string",
  "service": {
    "id": "string",
    "name": "string",
    "group": "string",
    "price": 0,
    "currency": {
      "name": "string",
      "symbol": "string"
    },
    "quantity": 2147483647
  },
  "color": {
    "id": 0,
    "ral": "string",
    "description": "string",
    "hex": "string",
    "rgb": "string",
    "sigma": "string",
    "pantone": "string",
    "createdAt": 0,
    "updatedAt": 0
  },
  "colo2": {
    "id": 0,
    "ral": "string",
    "description": "string",
    "hex": "string",
    "rgb": "string",
    "sigma": "string",
    "pantone": "string",
    "createdAt": 0,
    "updatedAt": 0
  },
  "color3": {
    "id": 0,
    "ral": "string",
    "description": "string",
    "hex": "string",
    "rgb": "string",
    "sigma": "string",
    "pantone": "string",
    "createdAt": 0,
    "updatedAt": 0
  },
  "color4": {
    "id": 0,
    "ral": "string",
    "description": "string",
    "hex": "string",
    "rgb": "string",
    "sigma": "string",
    "pantone": "string",
    "createdAt": 0,
    "updatedAt": 0
  },
  "color5": {
    "id": 0,
    "ral": "string",
    "description": "string",
    "hex": "string",
    "rgb": "string",
    "sigma": "string",
    "pantone": "string",
    "createdAt": 0,
    "updatedAt": 0
  },
  "currency": {
    "name": "string",
    "symbol": "string"
  },
  "confirmationReferenceNumber": "string",
  "rfqSupplierOrderId": "string",
  "economical": true,
  "id": "string",
  "name": "string",
  "externalId": "string"
}
— API to get the all addresses:
GET ⇒ /api/organizations/addresses
-
Query Parameters
-
searchContextas an Object:{ "page": 0, "count": 0, "query": "isDefault==1", "sort": "" }
-
-
Request Body
[ EMPTY ]
— API to update the order with information from the current step:
Corresponding UI 1 | Corresponding UI 2 | Corresponding UI 3 | Corresponding UI 4 | Corresponding UI 5 | Corresponding UI 6 | Corresponding UI 7 | Corresponding UI 8
PATCH ⇒ /api/customer-orders/{id}
-
Query Parameters
-
idas a String value
-
-
Request Body
{
  "field": "string",
  "value": "string",
}
— API to get all contacts:
GET ⇒ /api/organizations/contacts
-
Query Parameters
-
searchContextas an Object:{ "page": 0, "count": 0, "query": "isDefault==1", "sort": "" }
-
-
Request Body
[ EMPTY ]
— API to create a customer quotation:
POST ⇒ /api/bpm/customer-orders/{customerOrderId}/create-customer-quotation
-
Query Parameters
-
customerOrderIdas a String value
-
-
Request Body
[ EMPTY ]
— API to get customer order documents:
GET ⇒ /api/customer-orders/documents
-
Query Parameters
-
searchContextas an Object:{ "page": 0, "count": 0, "query": "order.id=in=({customerOrderId})", "sort": "" }
-
-
Request Body
[ EMPTY ]
— API to upload purchase order document:
POST ⇒ /zuul/storage/customer-orders/{customerOrderId}/documents/{orderDocumentTypeName}
-
Query Parameters
-
customerOrderIdas a String value -
orderDocumentTypeNameas a String value
-
-
Request Body
[ EMPTY ]
— API to cancel an order:
POST ⇒ /api/bpm/customer-orders/{customerOrderId}/cancel
-
Query Parameters
-
customerOrderIdas a String value
-
-
Request Body
{
  "comment": "string"
}
— API to get order details:
GET ⇒ /api/customer-orders/{id}
-
Query Parameters
-
idas a String value
-
-
Request Body
[ EMPTY ]
— API to get workflow history:
GET ⇒ /api/workflows/{threadId}/history
-
Query Parameters
-
threadIdas a String value
-
-
Request Body
[ EMPTY ]
— API to confirm order delivery:
POST ⇒ /api/bpm/customer-orders/{customerOrderId}/follow-up
-
Query Parameters
-
customerOrderIdas a String value -
statusas a String value: **"ORDER-DELIVERED-PARTIALLY"-
"ORDER-DELIVERED"
-
-
-
Request Body
{
  "comment": "string",
  "empty": true
}